Of course! Here is a comprehensive, big recipe for your No-Bake Pineapple Cream Dessert, complete with all the sections you requested.
—
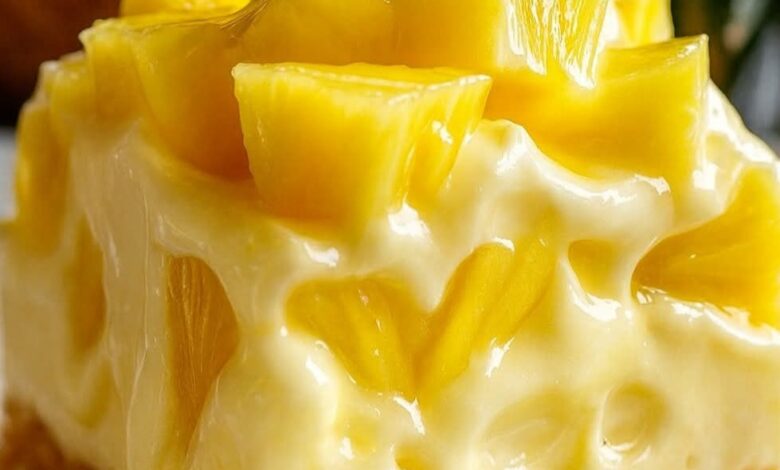
🥧 No-Bake Pineapple Cream Dessert: A Taste of Tropical Heaven
Introduction
This No-Bake Pineapple Cream Dessert is a symphony of textures and flavors that promises to transport your taste buds to a tropical paradise.It features a buttery, crisp graham cracker crust, a layer of luxuriously rich and tangy cream cheese filling, and a crown of sweet, glistening pineapple. The best part? It requires no oven, making it the perfect cool and refreshing treat for warm days, potlucks, or when you simply crave an impressive dessert without the fuss. It’s a beloved classic for a reason!
—
📜 A Brief History
This dessert is a direct descendant of the iconic Pineapple Cream Pie, a staple of American mid-20th-century cuisine. Its popularity soared with the advent of refrigerators and the widespread availability of canned pineapple and cream cheese. It embodies the “space-age” convenience and sweet, creamy flavors that defined the era’s desserts. Our no-bake square version modernizes the classic pie, making it even easier to slice, serve, and share at gatherings.
—
🍪 Ingredients
For the Crust:
· 2 ½ cups (250 g) crushed graham crackers or digestive biscuits
· ½ cup (115 g) unsalted butter, melted
· ¼ cup (50 g) granulated sugar (optional, adjust for sweetness)
For the Cream Layer:
· 16 oz (450 g) cream cheese, softened to room temperature
· 1 cup (240 ml) sweetened condensed milk
· 1 cup (240 ml) heavy whipping cream (cold)
· ½ cup (120 g) sour cream or plain Greek yogurt
· 1 cup (120 g) powdered sugar
· 2 teaspoons pure vanilla extract
For the Pineapple Topping:
· 3 cups (about 500 g) fresh pineapple chunks (or canned pineapple chunks, well-drained. Reserve the juice!)
· ½ cup (120 ml) pineapple juice (reserved from the can or from fresh pineapple)
· 2 tablespoons sugar (optional, only if pineapples aren’t very sweet)
· 1 tablespoon cornstarch mixed with 2 tablespoons water (this is your thickening slurry)
—
👩🍳 Instructions & Methods
Method 1: Preparing the Crust
1. Crush: Using a food processor or by placing the crackers in a sturdy zip-top bag and rolling with a rolling pin, crush the graham crackers into fine, even crumbs.
2. Combine: In a medium bowl, combine the crumbs with the melted butter and sugar (if using). Mix until the crumbs are uniformly moist and resemble wet sand.
3. Press: Line a 9×9 inch (23×23 cm) square pan with parchment paper, leaving some overhang for easy removal. Pour the crumb mixture into the pan and press it down very firmly and evenly using the bottom of a flat glass or measuring cup. This compact layer is crucial for a crust that holds together.
4. Chill: Place the pan in the refrigerator to set while you prepare the filling.
Method 2: Making the Creamy Filling
1. Beat Cream Cheese: In a large bowl, using an electric hand mixer or a stand mixer with the paddle attachment, beat the softened cream cheese on medium speed until it is completely smooth, creamy, and free of lumps.
2. Combine Wet Ingredients: Add the sweetened condensed milk, sour cream (or yogurt), vanilla extract, and powdered sugar to the cream cheese. Beat on medium-low speed until all ingredients are fully incorporated and the mixture is silky.
3. Whip the Cream: In a separate, clean, cold bowl, whip the cold heavy whipping cream on high speed until stiff peaks form. (Pro tip: A cold bowl and beaters help the cream whip faster and higher).
4. Fold Gently: Using a spatula, gently fold the whipped cream into the cream cheese mixture. Be careful not to overmix and deflate the air you just whipped into the cream. Fold until no white streaks remain.
Method 3: Creating the Pineapple Topping
1. Simmer Juice: In a small saucepan, combine the ½ cup of pineapple juice and the 2 tablespoons of sugar (if using). Heat over medium heat, stirring occasionally, until it comes to a gentle simmer.
2. Thicken with Slurry: Give the cornstarch-and-water mixture a quick stir (as it separates when sitting) and then whisk it into the simmering juice. Continue to cook for 1-2 minutes, whisking constantly, until the mixture thickens and becomes glossy and translucent.
3. Cool and Combine: Remove the saucepan from the heat and let the glaze cool for about 5 minutes. Then, gently toss the pineapple chunks in the glaze until they are evenly coated.
—
🧩 Assembly & Formation
1. Layer the Cream: Retrieve the chilled crust from the refrigerator. Pour the creamy filling over the crust and use an offset spatula or the back of a spoon to spread it into a smooth, even layer.
2. Add the Topping: Spoon the glazed pineapple chunks over the cream layer, spreading them out evenly. Gently press them down slightly.
3. Set: Cover the pan tightly with plastic wrap and refrigerate for at least 4 hours, but ideally overnight. This extended chilling time is non-negotiable as it allows the layers to firm up perfectly, making the dessert easy to slice.
—
🌿 Benefits
· No-Bake Convenience: Perfect for hot weather or when oven space is limited.
· Make-Ahead Marvel: An excellent dessert for entertaining as it must be made in advance.
· Customizable: The fruit topping can be easily swapped for other favorites like strawberries, peaches, or mango.
· Crowd-Pleaser: Its creamy, sweet, and tangy profile appeals to almost everyone.
· Refreshing: The pineapple provides a bright, fruity contrast to the rich cream layer.
—
🧪 Nutrition (Approximate per serving, serves 12)
Nutrient Amount
Calories ~ 480 kcal
Total Fat ~ 29 g
Saturated Fat ~ 17 g
Carbohydrates ~ 52 g
Sugars ~ 40 g
Protein ~ 7 g
Calcium ~ 120 mg
· Note: This is a rich dessert best enjoyed in moderation. Using light cream cheese and low-fat Greek yogurt can reduce the calorie and fat content.
—
❤️ For the Lovers
This dessert is for those who adore:
· The Creamiest Textures: If you love cheesecake, mousse, or anything with a velvety mouthfeel, this is for you.
· Tropical Flavors: A perfect homage to the classic Pina Colada.
· Contrast: The crunch of the crust against the pillowy cream and juicy pineapple is a textural dream.
· Nostalgic Treats: It’s a comforting, familiar flavor that feels like a hug from the past.
—
✅ Conclusion
The No-Bake Pineapple Cream Dessert is more than just a recipe; it’s a guaranteed success. It masterfully balances simplicity with elegance, and effort with impressive results. From its historic roots to its undeniable deliciousness, this dessert is a timeless treasure. Whether you’re a seasoned baker or a kitchen novice, this recipe will guide you to create a stunning dessert that will have everyone asking for seconds and begging for the recipe. So, grab your ingredients, and get ready to make a dessert that will be loved by all