The Art of Homemade Bread: A Complete Guide
Introduction
There is something profoundly comforting about the aroma of fresh bread filling your home. More than just sustenance, breadmaking is an ancient craft that connects us to generations past. This guide will walk you through creating a classic, soft homemade loaf—the kind with a golden crust and a tender, cloud-like interior. The “little secret” isn’t a single mystery ingredient, but rather an understanding of technique and time.
A Brief History
Bread is one of humanity’s oldest prepared foods, with evidence of its production dating back over 14,000 years. From the flatbreads baked on hot stones in Neolithic times to the leavened breads of ancient Egypt (where wild yeast was first harnessed), bread has been a cultural cornerstone. The simple loaf of white bread, as we know it, evolved with the industrialization of milling and the cultivation of yeast strains in the 19th century. Baking it at home is a return to a cherished, fundamental tradition.
Formation & The Science of Softness
The “fluffy as a cloud” texture is achieved through proper gluten formation and gas retention. Gluten, a network of proteins formed when flour mixes with water, gives bread its structure. The yeast consumes sugars and produces carbon dioxide gas, which gets trapped in the gluten network, causing the dough to rise. The “secret” lies in:
1. Proper Kneading: Develops the gluten network.
2. Adequate Proofing: Allows yeast time to produce gas and create an airy structure.
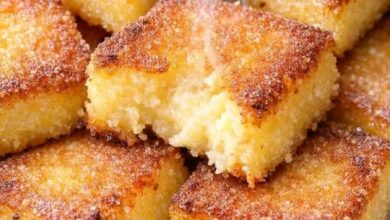
3. A Touch of Fat: The butter or oil tenderizes the gluten, yielding a softer crumb.
4. The Right Flour: Bread flour has a higher protein content than all-purpose, leading to better rise and chew, but all-purpose works well for a softer loaf.
Ingredients
· 500g (about 4 cups) Bread Flour or All-Purpose Flour (plus extra for dusting)
· 320ml (1⅓ cups) Warm Water (approximately 110°F/43°C)
· 7g (2¼ tsp) Active Dry Yeast (or one standard packet)
· 2 Tbsp (25g) Granulated Sugar
· 1½ tsp (9g) Fine Sea Salt
· 2 Tbsp (30g) Unsalted Butter or Neutral Oil (like vegetable or canola), softened
· Optional for topping: 1 Tbsp melted butter, olive oil, or an egg wash (1 egg + 1 Tbsp water)
Equipment
· Large mixing bowl
· Stand mixer with dough hook (optional, but helpful)
· Clean work surface
· Loaf pan (9×5 inch / 23×13 cm)
· Kitchen towel or plastic wrap
· Wire cooling rack
Methods & Instructions
Method 1: The Traditional Hand-Kneading Method
Step 1: Activate the Yeast
In your large bowl, combine the warm water, sugar, and yeast. Stir gently and let it sit for 5-10 minutes until it becomes frothy and creamy. This “proofs” the yeast, ensuring it’s alive and active.
Step 2: Form the Dough
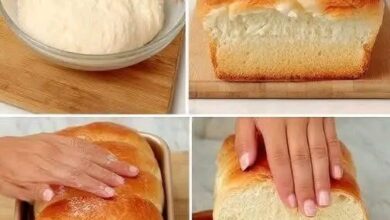
Add the flour and salt to the yeast mixture. Stir with a wooden spoon until a shaggy dough forms. Add the softened butter or oil.
Step 3: Knead
Turn the dough out onto a lightly floured surface. Knead by pushing the dough away from you with the heel of your hand, then folding it back over itself, turning it 90 degrees, and repeating. Do this for 10-15 minutes. The dough is ready when it is smooth, elastic, springs back when poked, and passes the “windowpane test” (stretch a small piece thinly enough to see light through it without tearing).
Step 4: First Rise (Bulk Fermentation)
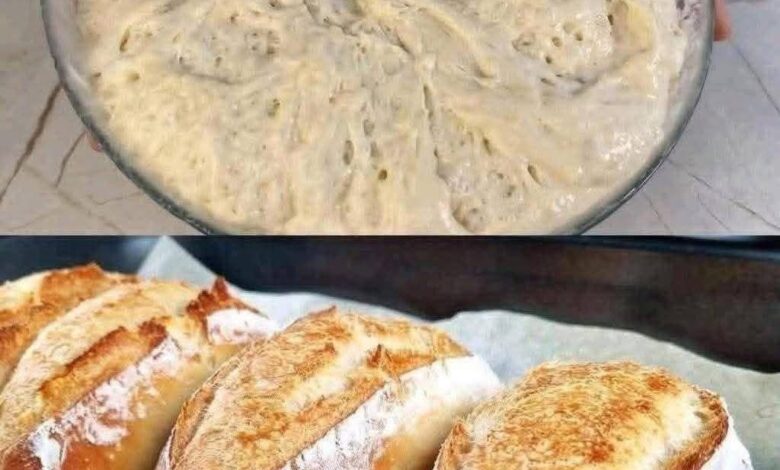
Place the dough in a lightly oiled bowl, turning to coat. Cover with a damp towel or plastic wrap. Let rise in a warm, draft-free place for 1-2 hours, or until doubled in size.
Method 2: The Stand Mixer Method
Step 1 & 2: Identical to the hand method—proof yeast in the mixer bowl.
Step 3: Attach the dough hook. With the mixer on low speed, add the flour and salt, then the butter/oil. Mix until combined, then increase to medium speed and knead for 8-10 minutes.
Step 4: Identical. Transfer to an oiled bowl for the first rise.
Shaping, Second Rise & Baking
Step 5: Shape the Loaf
Once risen, gently punch down the dough to release air. Turn it out onto a lightly floured surface. Flatten into a rectangle roughly the length of your loaf pan. Tightly roll the rectangle into a log, pinching the seam and ends closed. Place seam-side down into a greased loaf pan.
Step 6: Second Rise
Cover the pan with a towel and let rise again for 45-60 minutes, until the dough crowns about 1 inch above the pan rim.
Step 7: Bake
Preheat your oven to 375°F (190°C). For a glossy crust, brush the top with an egg wash. Bake for 30-35 minutes, until the top is deep golden brown and the loaf sounds hollow when tapped on the bottom. If you have an instant-read thermometer, the internal temperature should be 190°F (88°C).
Step 8: Cool
Immediately remove the bread from the pan. For a soft crust, brush the top with melted butter. Let it cool completely on a wire rack for at least 1 hour before slicing. This allows the interior structure to set.
Nutrition Information (Per Slice, approx. 12 slices per loaf)
· Calories: ~160 kcal
· Carbohydrates: 30g
· Protein: 5g
· Fat: 2.5g
· Fiber: 1g
· Sugars: 2g
· Note: Homemade bread contains no artificial preservatives or additives.
Benefits of Homemade Bread
· Control: You know exactly what goes in—no artificial preservatives, conditioners, or excess sodium.
· Freshness & Flavor: Unbeatable warm from the oven.
· Therapeutic Process: The rhythmic nature of kneading and the patience of proofing are excellent for mindfulness and reducing stress.
· Economical: Significantly cheaper than high-quality artisanal bakery loaves.
· Sensory Joy: Engages all your senses—touch, smell, sight, taste, and even sound (the crackle of a cooling crust!).
For the Bread Lovers
This recipe is your canvas. Lovers of different styles can adapt it easily:
· Whole Wheat Lovers: Substitute up to 50% of the flour with whole wheat (add an extra 1-2 Tbsp water).
· Herb & Garlic Lovers: Knead in 2 Tbsp of chopped fresh herbs and 1 tsp garlic powder with the butter.
· Seeded Multigrain Lovers: Replace ½ cup of flour with a mix of oats, sunflower seeds, and flax seeds. Soak seeds in warm water for 15 minutes first to prevent a dry loaf.
· Sweet Bread Lovers: Increase sugar to ¼ cup and add a teaspoon of vanilla or citrus zest.
Conclusion
Baking bread is an act of creation and patience. This simple recipe demystifies the process, revealing that the “secret” to a soft, heavenly loaf isn’t magic, but care. From the first proof of the yeast to the final slice, you are participating in an timeless ritual. The result is more than food; it’s a warm, fragrant, and deeply satisfying achievement. So gather your ingredients, clear your counter, and prepare to fill your kitchen with the world’s most beloved aroma. Happy baking