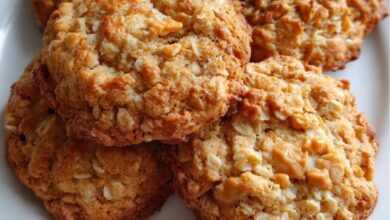
Here is a comprehensive guide to baking the ultimate, addictive treat: The Perfect Chewy Chocolate Chip Cookie. This recipe is designed to be your new go-to, and as warned, these cookies have a tendency to disappear at an alarming rate.
Introduction: The Quest for the Perfect Cookie
There are chocolate chip cookies, and then there are perfect chocolate chip cookies. This recipe is the result of countless batches, a deep dive into food science, and a singular goal: to create a cookie with crisp, golden-brown edges, a soft and chewy center, and an intense, buttery, caramelized flavor that complements the rich chocolate in every single bite. They are the kind of cookies that make you close your eyes and savor the moment. As the warning suggests, their allure is potent. I once baked a double batch for a neighborhood gathering, and by the time I had carried the tray from the kitchen to the porch, nearly half had vanished, snatched by eager hands and happy murmurs. This is that recipe.
The History: A Serendipitous American Classic
The chocolate chip cookie is a happy accident. In the 1930s, Ruth Graves Wakefield, who ran the Toll House Inn in Whitman, Massachusetts, was making a batch of Butter Drop Do cookies. She chopped up a bar of semi-sweet chocolate from Nestlé, expecting it to melt and disperse throughout the dough, creating chocolate cookies. Instead, the chocolate held its shape, softening into luscious pools. The result was a sensation. Her recipe, published in a Boston newspaper, skyrocketed in popularity. In exchange for a lifetime supply of chocolate, Wakefield allowed Nestlé to print her recipe on their packaging, and the “Toll House Cookie” became an American icon, forever cementing its place in culinary history.
The Formation: The Science of a Chewy Cookie
The magic of this particular recipe lies in its specific ratios and techniques, a deliberate deviation from the classic to achieve the perfect texture.
· Brown Sugar to White Sugar Ratio: Using more brown sugar than white sugar is crucial. Brown sugar is hygroscopic, meaning it attracts and retains moisture from the air (thanks to the molasses it contains). This moisture is the key to a soft and chewy texture that lasts for days. The white sugar contributes to the crisp edges and spread.
· Melted Butter: While many recipes call for room-temperature butter, we use melted butter here. Melted butter incorporates more of the water found in butter into the dough, creating more steam during baking. This steam helps the cookies spread and sets the stage for that chewy texture. It also begins the browning process even before the cookies hit the oven, deepening the flavor.
· Chilling the Dough: This is perhaps the most important step. Chilling solidifies the melted butter. This means the cookies will spread less in the oven, resulting in a thicker, more substantial cookie. More importantly, it gives the flour time to hydrate and the flavors time to meld and deepen, creating a more complex, caramel-like taste that is simply unmatched.
The Ingredients
· 2 cups + 2 tablespoons (285g) All-purpose flour
· 1 teaspoon Baking soda
· 1 teaspoon Salt
· 1 cup (230g) Unsalted butter, melted and cooled slightly
· 1 cup (220g) Dark brown sugar, packed
· ½ cup (100g) Granulated sugar
· 2 teaspoons Pure vanilla extract
· 1 large egg + 1 large egg yolk (at room temperature)
· 2 cups (340g) Semi-sweet chocolate chips or chopped dark chocolate
· Flaky sea salt, for sprinkling
The Methods: Step-by-Step Instructions
1. Whisk Dry Ingredients: In a medium bowl, whisk together the flour, baking soda, and salt. Set aside.
2. Combine Wet Ingredients: In a large bowl, whisk the melted butter, brown sugar, and granulated sugar together until completely combined and no sugar lumps remain. It should look like a thick, grainy paste.
3. Add Eggs and Vanilla: Whisk in the vanilla, then the egg and egg yolk. Whisk vigorously for about 30 seconds until the mixture becomes smooth, glossy, and lightens in color. This is where you’re building the structure.
4. Combine Wet and Dry: Pour the dry ingredients into the wet ingredients and fold them together with a rubber spatula. Mix just until no flour streaks remain. Be careful not to overmix, as this can develop gluten and make the cookies tough.
5. Add Chocolate: Gently fold in the chocolate chips until they’re evenly distributed throughout the dough.
6. Chill the Dough: Cover the bowl tightly with plastic wrap and refrigerate for at least 2 to 3 hours, but preferably 24 to 36 hours. This is the non-negotiable step for ultimate flavor and texture.
7. Preheat and Prepare: When ready to bake, preheat your oven to 375°F (190°C). Line two large baking sheets with parchment paper.
8. Scoop and Shape: Scoop the chilled dough into large balls, about 3 tablespoons each. Place them on the prepared baking sheets, leaving about 3 inches of space between each for spreading.
9. Bake: Bake for 10-12 minutes, or until the edges are golden brown and set, but the centers still look soft, puffed, and slightly underdone.
10. The Final Touch: Remove the baking sheet from the oven. While the cookies are still hot, gently tap the sheet on the counter a couple of times to help the centers settle. Immediately sprinkle a tiny pinch of flaky sea salt over each cookie.
11. Cool: Let the cookies cool on the baking sheet for 10 minutes. This allows them to finish setting up. Then, transfer them to a wire rack to cool completely, or until you can’t resist any longer.
The Benefits (Beyond Deliciousness)
While we can’t claim these are a health food, baking and enjoying them offers several genuine benefits:
· Mood Booster: The aroma of baking cookies is scientifically proven to trigger happy memories and elevate mood.
· Mindfulness: The process of measuring, mixing, and creating can be a meditative and grounding practice, a welcome break from a busy day.
· Connection: Sharing a batch of warm, homemade cookies is a universal act of kindness and love. It builds community, strengthens friendships, and creates lasting memories.
· Creativity: Baking is a science, but also an art. It allows for personal expression through the choice of chocolate (milk, dark, white, or a mix) or the addition of nuts, toffee, or dried fruit.
The Lovers: Who Is This Cookie For?
This cookie is for everyone, but it particularly speaks to:
· The Purist: Who believes a chocolate chip cookie should be flawless on its own, without gimmicks.
· The Texture Seeker: Who craves that perfect contrast between a crisp edge and a soft, doughy center.
· The Salted Caramel Devotee: Who understands the magic of the salty-sweet combination, perfected here with the finishing salt.
· The Late-Night Baker: Who finds peace and joy in the quiet ritual of creating something beautiful.
· The Generous Friend: Who shows love through food and delights in watching others enjoy their creations.
The Nutrition (Per Cookie, Approx.)
Let’s be honest, these are a treat to be enjoyed in moderation. (Based on a yield of 24 cookies)
· Calories: ~260
· Fat: ~14g
· Carbohydrates: ~33g
· Protein: ~3g
· Sugar: ~22g
Conclusion: Your Signature Recipe Awaits
This recipe is more than just a list of instructions; it’s an invitation. An invitation to slow down, to engage with simple, beautiful ingredients, and to create something that brings immeasurable joy to yourself and others. The little bit of patience required for chilling the dough is rewarded tenfold in the depth of flavor and perfect texture. These cookies will become your signature, the ones you’re asked to bring to every gathering, the ones that vanish from the plate before you’ve even set it down. As promised, their addictive nature is part of their charm. So, preheat your oven, and get ready to fall in love.