Absolutely! Here is a comprehensive guide to foolproof homemade bread, structured as you’ve requested and drawing from a variety of sources to give you a complete picture.
Introduction: The Magic of Foolproof Bread
There is a sensory experience few things in life can match: the aroma of freshly baked bread wafting through your home, the satisfying crunch of a golden crust, and the soft, warm pillowy interior slathered with melting butter. For many, the art of bread-making feels like a mysterious craft reserved for master bakers with stone-hearth ovens and decades of experience. The perception is that it requires meticulous kneading, precise timing, and a watchful eye over finicky yeast .
However, the reality is far more accessible. This guide is dedicated to the concept of “foolproof” homemade bread—loaves that are forgiving, require minimal fuss, and deliver spectacular results every time. Whether you’re a complete beginner or a seasoned cook looking for a reliable, no-stress recipe, the world of foolproof bread has something for you. From two-ingredient doughs that come together in an air fryer to no-knead artisan loaves that develop complex flavors over time, we will explore the simple science and joy of creating your own bread . We will delve into its rich history, uncover its surprising benefits, and provide you with multiple methods to ensure your success. Get ready to discover that you, too, can be a bread baker.
The History of Bread: From Ancient Grindstone to Modern Kitchen
The story of bread is, in many ways, the story of civilization itself. Long before we had ovens, recipes, or even agriculture, our ancestors were making a form of bread. Archaeological findings suggest that as far back as 14,400 years ago, hunter-gatherers in what is now Jordan were grinding grains, mixing them with water, and baking flatbreads on hot stones . This was a pivotal moment, predating the advent of farming. Even earlier, Neanderthals 75,000 years ago were likely making a kind of grain-based patty .
For millennia, bread was flat and dense. The transformation to the light, airy loaves we know today came with the discovery of leavening. This happy accident likely occurred when a grain-and-water mixture was left out, allowing wild yeasts from the air to colonize it and produce gases, causing it to rise . The ancient Egyptians are often credited with mastering this process, developing sophisticated baking techniques and even using dedicated bread ovens .
The quest to make bread-making more reliable and less arduous continued through the ages. A monumental shift occurred in the mid-19th century with the Industrial Revolution. In the 1850s, an innovator named George Hecker introduced a product that would change home baking forever: self-rising flour . By pre-mixing flour with consistent amounts of baking powder and salt, he eliminated the guesswork and inconsistency that plagued housewives of the time. This “foolproof” innovation was so ingenious it earned a spot at the World’s Fairs in London and New York . This spirit of innovation continues today with modern “foolproof” methods like no-knead doughs and two-ingredient recipes, proving that the evolution of bread is a story of constant adaptation to make this staple food more accessible to everyone .
Formation: The Simple Science of a Foolproof Loaf
Understanding the basic science behind bread-making can make the process even more foolproof. At its heart, a simple bread recipe has four key components, each playing a vital role:
· Flour: This provides the structure. When flour is mixed with water, proteins in the flour (glutenin and gliadin) bond together to form gluten. This elastic network stretches and traps the gases produced by the leavening agent, allowing the bread to rise and giving it its characteristic chewy texture .
· Leavening Agent: This is what makes the bread rise. There are two main types used in foolproof recipes:
· Biological (Yeast): Yeast is a living fungus. When fed with sugars in the flour, it produces carbon dioxide gas as a byproduct. This gas fills the gluten network, causing the dough to expand. The long, slow fermentation in no-knead recipes allows for complex, tangy flavors to develop .
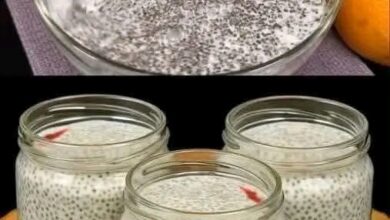
· Chemical (Baking Powder/Baking Soda): These are used in “quick breads” . Baking powder reacts with liquid and heat to produce carbon dioxide bubbles instantly, eliminating the need for long rising times. The Irish soda bread and the two-ingredient yoghurt bread are perfect examples of this chemical reaction in action .
· Liquid (Water, Milk, Yoghurt): Water is essential for hydrating the flour and developing gluten. Using milk or yoghurt, as in many foolproof recipes, adds fat and acidity, resulting in a more tender crumb and a richer flavor. The acidity in yoghurt also helps the chemical reaction with baking soda .
· Salt: Salt is not just for flavor. It strengthens the gluten structure, making it more elastic, and it also regulates the activity of the yeast, preventing it from working too quickly .
In foolproof recipes, the goal is to manage these elements in the simplest way possible. No-knead methods use a very high hydration (wet dough) and a long, slow rise to let the gluten develop on its own, without any work from you . Quick breads bypass gluten development entirely, using chemical leaveners and gentle mixing to ensure tenderness .
Benefits of Baking Your Own Bread
Why go to the trouble of making your own bread when a supermarket shelf is fully stocked? The benefits are numerous and compelling .
· Health and Nutrition: You are in complete control. Packaged breads are often among the highest sources of sodium in the American diet and can contain added sugars like high fructose corn syrup, as well as preservatives and additives to extend shelf life . When you bake at home, you can choose whole wheat flour for more fiber and nutrients, control the amount of salt, and use natural sweeteners like honey. You can also boost the nutritional profile by adding seeds, nuts, or even grated vegetables like carrot, which has been shown to have health benefits .
· Superior Taste and Customization: The flavor of a freshly baked homemade loaf is simply unmatched. You can customize your bread to your exact preferences, adding herbs like rosemary and thyme, cheeses, garlic, or different types of seeds and grains .
· Cost-Effectiveness: While the initial outlay for ingredients might seem higher, baking your own bread is often cheaper in the long run. One analysis found that a homemade loaf of whole-wheat bread could cost roughly $1.91**, compared to a national average of **$2.10 for a store-bought loaf. The savings become even more significant when you consider the quality of the ingredients you’re using .
· Mindfulness and Satisfaction: In our fast-paced world, the process of mixing, shaping, and baking bread can be a form of edible meditation. It is a rewarding, tangible skill that connects us to millennia of human history and provides a deep sense of accomplishment .
Methods & Recipes: Three Foolproof Paths to Bread Heaven
Here are three distinct foolproof methods, ranging from instant to artisanal.
Method 1: The Two-Ingredient Air Fryer Bread (No Yeast, No Oven Needed)
This is arguably the world’s easiest bread. It’s a quick bread, meaning it uses a chemical reaction instead of yeast for rising, and it’s ready in under an hour .
· Yield: 1 small loaf
· Prep time: 10 minutes
· Cook time: 40-55 minutes
Ingredients:
· 500g self-raising flour
· 475g Greek yoghurt
· Pinch of salt (optional)
· 1 egg, beaten with a splash of milk (for egg wash)
· Sesame seeds or other toppings (optional)
Instructions:
1. Mix: In a large bowl, combine the self-raising flour and salt. Add the Greek yoghurt and mix with a spoon or your hands until a smooth, cohesive dough forms. Add a tiny dash of water if it seems too dry .
2. Prep for Baking: Line your air fryer basket with a piece of parchment paper. Place the dough in the basket and shape it into a round loaf. Brush the top generously with the egg wash and sprinkle with your chosen toppings .
3. Bake: Place the basket in the air fryer. Bake at 160°C (320°F) for 40 minutes. The loaf is done when it is golden brown and sounds hollow when tapped on the bottom. If it needs more time, continue baking, but cover with foil to prevent over-browning .
4. Cool: Carefully remove the loaf from the air fryer and let it cool on a wire rack before slicing.
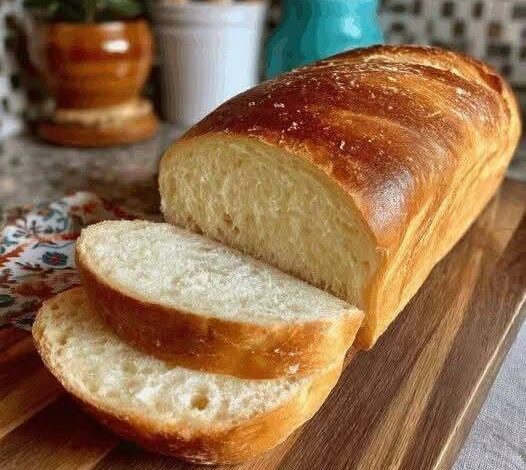
Method 2: The Artisan No-Knead Bread (The Set-It-and-Forget-It Method)
This method, popularized by the Sullivan Street Bakery, creates a loaf with a crackly crust and an open, holey crumb that rivals any bakery sourdough. The secret is time, not effort .
· Yield: 1 ½ lb loaf
· Prep time: 15 minutes
· Rise time: 12-14 hours
· Cook time: 45-60 minutes
Ingredients:
· 3 cups all-purpose or bread flour, plus more for dusting
· 1 ½ cups lukewarm water
· ¼ teaspoon instant yeast
· 1 ¼ teaspoons salt
· 1 teaspoon olive oil (for coating the bowl)
Instructions:
1. Mix (Day 1): In a large bowl, combine the flour, yeast, and salt. Add the lukewarm water and mix with a wooden spoon or your hand until a shaggy, sticky dough forms. Do not overmix .
2. First Rise (Bulk Fermentation): Lightly coat a second bowl with olive oil. Place the dough in the oiled bowl and turn to coat. Cover the bowl tightly with plastic wrap and let it sit at room temperature (around 20-22°C / 68-72°F) for 12 to 18 hours. The dough will be bubbly and more than doubled in size .
3. Shape (Day 2): The dough will be very sticky. Generously flour a work surface. Gently turn the dough out onto the surface. Fold the dough over itself once or twice. Let it rest for 15 minutes. Then, using floured hands, gently and quickly shape it into a ball .
4. Second Rise (Proofing): Place a large piece of parchment paper on a work surface and dust it generously with flour. Place the dough seam-side down on the paper and dust the top with more flour. Cover with another cotton towel and let it rise for 1 to 2 hours, until it has doubled in size .
5. Bake: About 30 minutes before the second rise is done, place a heavy Dutch oven (6-8 quart) with its lid inside your oven and preheat to 230-260°C (450-500°F) . Once the dough is ready, carefully remove the hot pot from the oven. Using the parchment paper as a sling, lower the dough into the pot (seam-side up). Cover with the lid and bake for 30 minutes .
6. Finish: Remove the lid and bake for another 15-30 minutes, until the loaf is deep golden brown. Carefully remove the bread from the pot and let it cool completely on a wire rack before slicing .
Method 3: The 30-Minute Quick Bread (When You Need Bread Right Now)
This recipe is a lifesaver for last-minute dinners. It uses baking powder for instant rise and is incredibly versatile .
· Yield: 1 small loaf
· Prep time: 5 minutes
· Cook time: 25-30 minutes
· Total time: ~30-35 minutes
Ingredients:
· 3 cups all-purpose flour
· 2 teaspoons baking powder
· 1 teaspoon salt
· 1 tablespoon sugar (optional, for browning)
· 1 cup warm water
· 2 tablespoons olive oil
Instructions:
1. Preheat: Preheat your oven to 190°C (375°F) . Grease a loaf pan or line a baking sheet with parchment paper .
2. Mix Dry: In a large bowl, whisk together the flour, baking powder, salt, and sugar until well combined .
3. Combine: Pour in the warm water and olive oil. Stir with a spoon until a soft, slightly sticky dough forms. Do not overmix .
4. Shape: Transfer the dough to your prepared pan. If using a baking sheet, shape it into a rustic round loaf. Smooth the top lightly with wet hands .
5. Bake: Bake for 25-30 minutes, until the top is golden brown and a toothpick inserted in the center comes out clean .
6. Cool: Let the bread cool in the pan for 10 minutes, then transfer to a wire rack to cool slightly before serving .
Nutrition Information (Approximate)
The nutritional content will vary based on the recipe and ingredients used. Below are estimates for each of the three featured recipes.
Nutrient Two-Ingredient Bread No-Knead Artisan Bread 30-Minute Quick Bread
Serving Size 1 slice (1/12 loaf) 1 slice (1/12 loaf) 1 slice (1/8 loaf)
Calories ~160 ~118 ~150
Total Fat ~2g ~0.7g ~3g
Carbohydrates ~28g ~24g ~26g
Protein ~7g ~3.3g ~4g
Sodium ~50mg ~243mg ~290mg
Note: The two-ingredient bread is higher in protein due to the Greek yoghurt.
For the Lovers of Bread
This final section is for everyone who cherishes bread in all its forms.
Bread is more than just food; it’s a universal language of comfort and community. For the lovers of simplicity, the two-ingredient air fryer bread is a revelation—proof that you don’t need a dozen ingredients or years of experience to pull a beautiful, crusty loaf from the oven. It’s for the busy parent, the college student, or anyone who thought baking wasn’t for them .
For the lovers of tradition and process, the no-knead method is a romance. It’s a slow dance between flour, water, time, and wild yeasts. The long fermentation is a labor of love that rewards the patient baker with complex, deep flavors and a rustic, bakery-quality crust that shatters with each bite .
For the lovers of health and wellness, homemade bread is an act of self-care. It’s about knowing exactly what fuels your body, choosing nutrient-dense ingredients like whole wheat flour and seeds, and avoiding the preservatives and excess sodium found in commercial loaves. It’s bread that loves you back .
And for the lovers of community, bread is meant to be shared. It’s the loaf you bring to a dinner party, the warm slices you serve to family with soup on a cold night, or the simple gift you give a friend just because. The reviews and interactions from home bakers sharing their successes and variations are a testament to the joyful community that bread builds . Whether you’re a lover of the crust, the crumb, the process, or the result, there is a foolproof loaf out there with your name on it.
Conclusion: Your Foolproof Future in Bread
The journey to becoming a bread baker doesn’t have to be intimidating. As we’ve explored, “foolproof” bread comes in many forms, each designed to demystify the process and guarantee a delicious result. From the instant gratification of a no-yeast, 30-minute loaf to the deeply flavorful, set-it-and-forget-it nature of overnight no-knead bread , and even the modern convenience of air fryer baking , there is a perfect starting point for everyone.
By understanding the simple science of flour, leaveners, and time, you are empowered to take control of your food, tailor it to your tastes and dietary needs, and connect with a practice that is thousands of years old . The benefits extend beyond the plate, offering a healthier, more economical, and deeply satisfying alternative to store-bought loaves .
For all the lovers of good food and simple pleasures, we hope this guide has inspired you to preheat your oven and get your hands a little floury. The aroma of your first foolproof loaf baking in the oven is the beginning of a beautiful new chapter. Happy baking