Here is a big, comprehensive guide to making Easy Amish White Bread, covering everything from a simple introduction to its rich history, nutritional information, and storage tips.
The Ultimate Guide to Easy Amish White Bread: A Slice of Homemade Comfort
Introduction
There is an aroma that universally signals comfort, warmth, and home—the smell of fresh bread baking in the oven. Easy Amish White Bread is the epitome of this experience. Known for its slightly sweet flavor and velvety, soft texture, this homemade bread is a staple that puts modern store-bought loaves to shame . Often referred to as “milk bread” due to its tender crumb, this recipe is incredibly forgiving and perfect for bakers of all skill levels . Whether you are looking for the perfect base for a hearty sandwich, the ideal companion for a bowl of soup, or simply a warm slice slathered with butter and jam, this Amish White Bread recipe delivers a foolproof, delicious result every time .
What is Amish White Bread?
Amish White Bread is a classic homemade sandwich loaf characterized by its soft, tender texture and subtle sweetness . Unlike crusty artisan breads with a chewy crumb and sour flavor, this bread is smooth, fluffy, and mild. It is designed to be versatile, making it a favorite for both sweet and savory applications, from French toast to grilled cheese sandwiches . The recipe relies on simple, pantry-staple ingredients, proving that sometimes the most extraordinary things come from the simplest beginnings .
The History and Tradition
The origins of this bread are rooted in the traditions of the Amish communities in the United States, who are known for their simple, hearty, and wholesome cooking made from scratch . Amish White Bread embodies the values of community, warmth, and a from-scratch lifestyle. Passed down through generations, this recipe isn’t just about food; it’s about taking the time to create something nourishing for your family . It represents a return to basics, using fundamental techniques to create a loaf filled with “homemade love” .
Why You (and Your Family) Will Love This Bread
· Lovers of Sandwiches: Its sturdy yet soft texture slices perfectly without crumbling, making it the ideal vessel for everything from deli meats to tuna salad .
· Lovers of Toast: It toasts beautifully, achieving a golden-brown crispiness that pairs perfectly with butter, honey, or jam .
· Lovers of Baking: The recipe is straightforward and reliable, offering immense satisfaction to both novice and experienced bakers .
· Lovers of Comfort Food: The soft, pillowy interior and slightly sweet crust evoke a sense of nostalgia and warmth that store-bought bread simply cannot replicate .
Ingredients
This recipe uses simple ingredients to create two standard loaves. Ensuring your liquids are at the correct temperature is key to activating the yeast.
Wet Ingredients
· 1 cup warm water (110°F – 120°F): Helps activate the yeast .
· 1 cup warm milk (110°F – 120°F): Creates a softer, richer, more velvety crumb compared to water alone .
· ¼ cup unsalted butter, melted (plus extra for brushing): Adds richness, flavor, and tenderness .
· ¼ cup vegetable oil (or canola oil): Helps keep the bread moist and extends its shelf life .
Dry Ingredients
· ⅔ cup granulated sugar: Feeds the yeast, adds a subtle sweetness, and helps create a soft texture . (Can be reduced to ⅓ cup for a less sweet loaf) .
· 1 ½ tablespoons active dry yeast (or instant yeast): The leavening agent that makes the bread rise .
· 1 ½ teaspoons salt: Essential for flavor; without it, the bread will taste flat .
· 5 ½ to 6 cups bread flour or all-purpose flour: Bread flour has a higher protein content, resulting in a chewier texture, while all-purpose flour will yield a more tender loaf .
Methods: Step-by-Step Instructions
Here are two ways to make this delicious bread: by hand/mixer or in a bread machine.
Method 1: Stand Mixer or By Hand
1. Activate the Yeast (Proofing)
In the bowl of a stand mixer or a large bowl, dissolve the sugar in the warm water and warm milk. Stir in the yeast and let it sit for 5-10 minutes. The mixture should become frothy or foamy. This “bloom” confirms your yeast is alive and active . If it doesn’t foam, your yeast may be dead, and you should start over.
2. Mix the Dough
Add the salt, melted butter, and vegetable oil to the yeast mixture. Add 2 cups of flour and mix until combined. With the mixer running (or by stirring with a spoon), gradually add the remaining flour, one cup at a time, until the dough begins to pull away from the sides of the bowl .
3. Kneading (The Formation of Gluten)
· Mixer Method: Attach the dough hook and knead on medium-low speed for about 5-7 minutes. The dough should become smooth and elastic .
· By Hand Method: Turn the dough out onto a lightly floured surface. Knead by pressing down and pushing the dough away from you with the heel of your hand, then folding it back toward you. Give it a quarter turn and repeat. Continue for 8-10 minutes until the dough is smooth and springs back slowly when poked .
4. First Rise (Fermentation)
Place the dough in a large, lightly greased bowl, turning it once to coat the top. Cover the bowl with plastic wrap or a clean, damp kitchen towel. Let it rise in a warm, draft-free place for 1 to 1.5 hours, or until doubled in size .
5. Shaping and Second Rise
Punch down the dough to release the air bubbles. Turn it out onto a lightly floured surface and knead briefly. Divide the dough into two equal halves. Shape each half into a loaf by patting it into a rectangle and rolling it up tightly, pinching the seams to seal . Place the loaves seam-side down into two greased 9×5-inch loaf pans. Cover and let rise for another 30-45 minutes, or until the dough has risen about an inch above the rims of the pans .
6. Baking
While the loaves are on their second rise, preheat your oven to 350°F (175°C). Bake for 25-35 minutes. The bread is done when the top is golden brown and the loaf sounds hollow when tapped. For precision, the internal temperature should read 190°F (88°C) .
7. The Butter Finish
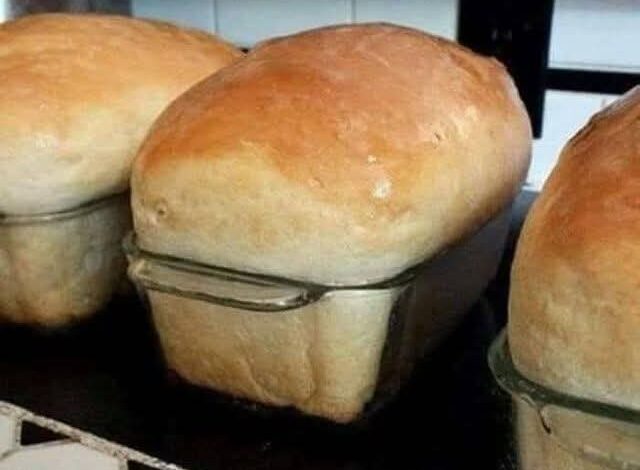
Immediately upon removing the loaves from the oven, brush the tops with melted butter. This gives the crust a beautiful shine, a rich flavor, and a softer texture . Let the loaves cool in the pans for 5-10 minutes, then turn them out onto a wire rack to cool completely before slicing .
Method 2: Bread Machine Instructions
Yes, you can use a bread machine to simplify the process!
1. Add the ingredients to your bread machine pan in the order recommended by your manufacturer (typically liquids first, then dry ingredients, with yeast last).
2. Select the “White Bread” or “Basic” cycle and press start .
3. Some bakers prefer to use just the “Dough” cycle on the machine. Once the cycle is complete (after the first rise), remove the dough, punch it down, shape it into loaves, place them in pans, and follow the instructions above for the second rise and baking in a conventional oven .
Benefits of Baking Your Own Bread
· Health & Nutrition: You control the ingredients. There are no preservatives, dough conditioners, or high-fructose corn syrup found in many commercial breads .
· Cost-Effective: Baking your own bread is significantly cheaper than buying high-quality artisan loaves from a bakery.
· Stress Relief: The process of kneading and shaping dough can be incredibly therapeutic and mindful .
· Unmatched Flavor: The taste of fresh, homemade bread is superior to anything prepackaged, filling your home with an irresistible aroma .
Nutrition Information
Please note that these are estimates and will vary based on specific ingredients and serving sizes.
Based on a recipe yielding 24 slices (2 loaves) :
Nutrient Amount per Slice
Calories 140-152 kcal
Carbohydrates 26-28g
Protein 3-4g
Fat 3-4g
Sugar 5-6g
Sodium 150-180mg
Troubleshooting: Common Questions & Lovers’ Queries
· Why didn’t my dough rise?
· Old Yeast: Your yeast might be expired. Always check the date and proof it first .
· Liquid Too Hot: If the water or milk was over 130°F, it killed the yeast. Liquids should feel like warm bathwater .
· Too Cold: If your kitchen is cold, the dough will rise slowly. Find a warmer spot, like an oven with only the light on .
· Can I make this ahead of time? Yes! After shaping the loaves and placing them in the pans, cover them tightly and refrigerate for up to 24 hours. When ready to bake, let them sit at room temperature while the oven preheats, then bake as directed .
· Can I add things to the dough? Absolutely. For a variation, try kneading in a handful of seeds, herbs, or even cinnamon and raisins for a sweet swirl .
How to Store and Preserve Your Bread
To maintain that just-baked freshness:
· Room Temperature: Wrap the completely cooled loaf tightly in plastic wrap or store it in an airtight container or bread box for up to 3-4 days .
· Refrigeration: While you can refrigerate it for up to a week, this tends to dry bread out faster. Room temperature or freezing is usually better .
· Freezing: This bread freezes beautifully. Wrap the cooled loaf tightly in plastic wrap, then a layer of aluminum foil, or place it in a freezer-safe bag. Freeze for up to 3 months. Thaw at room temperature .
Conclusion
Easy Amish White Bread is more than just a recipe; it is an invitation to slow down and enjoy the simple pleasures of life. It is a testament to the fact that with a few humble ingredients and a little bit of patience, you can create something truly extraordinary. The soft, tender crumb, the golden-brown crust, and the delicate sweetness come together to form a loaf that is sure to become a beloved staple in your home.
Whether you enjoy it warm from the oven with a pat of butter, as the foundation for a towering sandwich, or transformed into the best French toast of your life, this bread delivers pure, comforting joy. So, preheat your oven, dust off your mixing bowl, and experience the magic of homemade Amish White Bread. Your kitchen—and everyone in it—will thank you. 🍞💛