Here is a comprehensive guide to making Cheesy Garlic Chicken Wraps, structured to include all the elements you’ve requested.
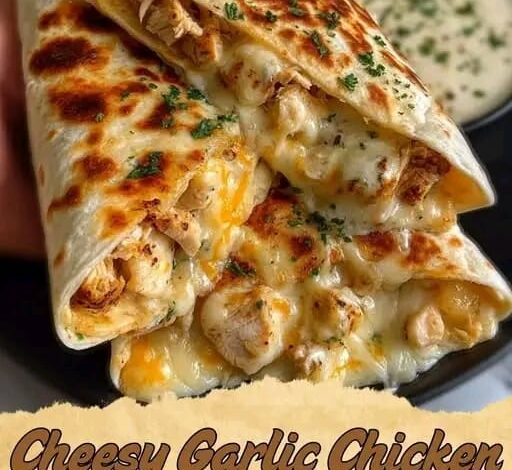
The Ultimate Guide to Cheesy Garlic Chicken Wraps
Introduction
Welcome to the world of Cheesy Garlic Chicken Wraps, the ultimate fusion of comfort, convenience, and bold flavor . Imagine sinking your teeth into a warm, golden-brown tortilla that shatters with a satisfying crunch, revealing a luscious, gooey interior filled with tender, juicy chicken and a rich, aromatic garlic depth . This isn’t just a meal; it’s an experience—a perfect handheld harmony of textures and tastes that appeals to kids and adults alike . Whether you’re a busy parent seeking a quick weeknight victory, a meal-prepper looking for a high-protein lunch, or simply a lover of cheesy comfort food, this recipe is designed to deliver restaurant-quality results with minimal fuss . Get ready to create a dish that’s destined to become a star in your home cooking rotation .
Why Food Lovers Adore This Recipe
What is it about these wraps that makes them so universally appealing? It’s the masterful combination of simple elements that create something truly special.
· The Garlic Aroma: The moment the fresh garlic hits the hot pan, it releases an irresistible, pungent fragrance that signals something delicious is on its way . This isn’t a meek hint of garlic; it’s a confident, savory backbone that elevates the entire dish .
· The Cheese Pull: For cheese lovers, the moment you slice into the wrap and see the molten, stretchy mozzarella and sharp cheddar cascade out is pure magic . It’s a visual and textural promise of the creamy, indulgent bite to come.
· The Textural Contrast: The crispy, buttery exterior of the toasted tortilla provides the perfect counterpoint to the soft, melty filling . Each bite delivers a multi-sensory experience that keeps you coming back for more .
· Customization is Key: This recipe is a canvas for your creativity. Food lovers appreciate that it can be easily adapted to suit any mood or dietary need—from adding a spicy kick with jalapeños to packing in extra veggies .
The History of the Wrap
The Cheesy Garlic Chicken Wrap, in its modern form, is a relatively recent invention, yet it stands on the shoulders of culinary traditions from around the globe. The concept of enveloping a savory filling in flatbread is ancient, with roots in the Middle East, where dishes like shawarma and falafel have been served in pita and other flatbreads for centuries .
The specific term “wrap” as we know it today gained popularity in the United States during the late 20th century, particularly in the 1980s and 1990s . It emerged as a versatile and portable alternative to the sandwich, often perceived as a healthier option. The wrap’s rise paralleled the fast-casual dining boom, with chains like Chipotle popularizing the customizable burrito-style meal .
Our specific combination—the “Cheesy Garlic Chicken” wrap—is a testament to American fusion cuisine. It marries the Italian-inspired love affair with garlic and cheese (think garlic bread and chicken Parmesan) with the Mexican-American format of the flour tortilla . Social media further propelled its popularity, as food bloggers shared visually stunning images of golden-brown, cheese-draped wraps, cementing its status as a beloved modern classic .
Detailed Ingredients Breakdown
The quality of your ingredients directly impacts the final dish. Here’s what to look for:
· Chicken (2 cups, cooked and shredded/chopped): Boneless, skinless chicken breast is a lean, mild-flavored protein that absorbs the garlic and seasonings beautifully . For a juicier, more forgiving option, boneless, skinless chicken thighs are excellent due to their higher fat content . A store-bought rotisserie chicken is a fantastic time-saver and adds great flavor .
· Fresh Garlic (4 cloves, minced): This is non-negotiable for peak flavor. Fresh cloves contain enzymes that release allicin, the compound responsible for garlic’s signature pungent and aromatic depth . Pre-minced varieties in jars cannot replicate this fresh, vibrant taste .
· Cheese Blend (1-1½ cups shredded): A combination is key.
· Mozzarella (1 cup): Use low-moisture, part-skim or whole milk mozzarella for that essential, stretchy, gooey texture .
· Cheddar (½-1 cup): Sharp cheddar adds a tangy, flavorful backbone and beautiful color . For the best melt, always shred your cheese from a block. Pre-shredded cheese contains anti-caking agents (like cellulose) that prevent it from melting smoothly .
· Flour Tortillas (4 large, 8-10 inch): Large, soft flour tortillas are the standard. Look for brands with simple ingredients (flour, water, fat, salt) . They need to be pliable to wrap without cracking.
· Olive Oil (1 tbsp): Used to sauté the garlic and chicken. Extra virgin olive oil adds a nice subtle flavor .
· Butter (1 tbsp): For toasting the wraps. It creates a rich flavor and a gorgeous, golden-brown, crispy crust .
· Seasonings: Salt and freshly ground black pepper are essential to wake up all the flavors . Optional additions include onion powder, smoked paprika, or dried oregano for extra depth .
· Garnish (Optional): Fresh chopped parsley or green onions add a pop of color and a touch of freshness that cuts through the richness .
Step-by-Step Formation & Instructions
Follow these steps for wrap perfection.
Prep Work:
1. Prepare the Chicken: If starting with raw chicken, season it with salt and pepper. Bake, pan-fry, or grill until cooked through (internal temperature of 165°F or 74°C). Let it rest for a few minutes, then chop or shred it into bite-sized pieces .
2. Grate the Cheese: Grate your cheeses from a block and mix them together in a bowl .
Creating the Filling:
1. Bloom the Garlic: In a skillet over medium heat, warm the olive oil. Add the minced garlic and sauté gently for about 30-60 seconds until fragrant. Be careful not to let it brown or burn, as this will make it bitter .
2. Infuse the Chicken: Add the cooked, chopped chicken to the skillet. Stir to coat it in the garlic oil and let it heat through for 3-4 minutes. Season with salt, pepper, and any other desired spices .
3. Melt the Cheese (Two Methods):
· Skillet Method: Remove the pan from the heat. Immediately add the shredded cheese blend to the hot chicken and stir vigorously until the cheese melts and coats the chicken in a glorious, sticky mass .
· Assembly Method: For a cleaner assembly, you can skip melting the cheese in the pan and instead use it as a layer inside the wraps, trusting the final toasting to melt it .
Assembling the Wraps (Formation):
1. Warm the Tortillas: This step is crucial for pliability. Heat each tortilla in a dry skillet for 15-20 seconds per side, or microwave them briefly wrapped in a damp paper towel .
2. Fill and Roll: Lay a warm tortilla flat. If you didn’t melt the cheese in the pan, sprinkle a layer of shredded cheese on the lower third of the tortilla. Spoon a quarter of the cheesy chicken mixture (or plain chicken) on top of the cheese. Add another sprinkle of cheese for extra “gooey-ness” .
3. The Rolling Technique: Fold the left and right sides of the tortilla inward over the filling. Then, take the bottom edge and fold it up and over the filling, tucking it tightly. Roll the wrap away from you, keeping the sides tucked in, until it’s completely sealed and seam-side down .
Achieving the Perfect Finish:
1. Toast the Wraps: In a clean skillet or grill pan, melt the butter over medium heat. Place the wraps seam-side down. Cook for 2-4 minutes per side, pressing gently with a spatula, until the tortilla is golden brown, crispy, and the cheese is fully melted inside .
2. Rest and Serve: Remove the wraps from the skillet and let them rest on a cutting board for 1-2 minutes. This allows the melted cheese to set slightly, preventing it from spilling out immediately when cut . Slice diagonally, garnish with fresh parsley or green onions, and serve warm.
Alternative Cooking Methods
· Air Fryer: Preheat your air fryer to 375°F (190°C). Lightly spray the assembled wraps with olive oil. Place them in the basket in a single layer, seam-side down, and cook for 6-8 minutes, flipping halfway through, until golden and crispy .
· Oven-Baked: Preheat your oven to 400°F (200°C). Place the assembled wraps on a baking sheet lined with parchment paper. Brush or spray with oil. Bake for 10-12 minutes, flipping once, until the wraps are golden and the cheese is bubbly .
The Benefits: Nutrition and Beyond
This dish isn’t just delicious; it offers several benefits:
· High-Quality Protein: Chicken is an excellent source of lean protein, which is essential for muscle repair, maintaining energy levels, and promoting satiety, helping you feel full and satisfied for longer . A single wrap can pack around 28-38 grams of protein .
· Bone Health: The cheeses (mozzarella and cheddar) provide a good amount of calcium and vitamin D (if fortified), which are vital for maintaining strong bones and teeth .
· Immune-Boosting Properties: Garlic is more than just a flavor powerhouse. It contains compounds like allicin, which have been linked to supporting immune function, promoting heart health, and offering anti-inflammatory benefits .
· Healthy Fats: Olive oil contributes heart-healthy monounsaturated fats and antioxidants .
· Customizable for Health: This recipe is easily adaptable for various dietary needs. You can use whole-wheat or low-carb tortillas for more fiber, add vegetables for extra vitamins and fiber, or opt for reduced-fat cheeses and Greek yogurt in place of mayonnaise to lower the calorie and fat content .
Chef’s Tips for Success
· Don’t Overstuff: It’s tempting to pile in the filling, but overstuffing makes rolling difficult and can cause the wraps to burst during cooking . Stick to about ¾ cup of filling per wrap .
· Control the Heat: Cook the wraps over medium heat. High heat will burn the outside of the tortilla before the cheese inside has had a chance to melt .
· Dry Chicken for Better Browning: If searing raw chicken, pat it completely dry with paper towels before it hits the pan. Excess moisture creates steam, which prevents the beautiful, flavorful Maillard browning .
· Cover the Pan: While toasting the assembled wraps, covering the pan with a lid for the first minute or two helps trap heat and steam, ensuring the cheese inside melts completely and the filling is hot before the outside gets too dark .
· Prevent Sogginess: If prepping fillings ahead, store wet ingredients like tomatoes or salsa separately and add them just before serving. When reheating leftovers, always use a skillet, air fryer, or oven to restore crispness—avoid the microwave .
Serving Suggestions
These wraps are a complete meal on their own, but they pair beautifully with a variety of sides:
· Classic Sides: A crisp green salad with a light vinaigrette, coleslaw, or a bowl of warm tomato soup .
· Dips: Serve with a side of ranch dressing, cool sour cream, garlic aioli, salsa, guacamole, or warm pizza sauce for dipping .
· Indulgent Sides: For a more indulgent meal, pair them with sweet potato fries, regular French fries, or crispy roasted potato wedges .
Conclusion
The Cheesy Garlic Chicken Wrap is more than just a recipe; it’s a testament to the magic that happens when simple, quality ingredients are treated with care. From the initial sizzle of garlic in the pan to the final satisfying crunch of the golden tortilla, this dish delivers a comforting, flavorful, and deeply satisfying experience. It’s a versatile canvas for your culinary creativity, a reliable weeknight hero, and a guaranteed crowd-pleaser. We hope this comprehensive guide inspires you to head to the kitchen, get a little messy with cheese, and create something truly delicious for yourself and the ones you love. Enjoy every last bite