Of course! Here is a much more expansive and detailed version of your Peanut Butter Balls recipe, structured with all the elements you requested.
A Timeless Treat: The Homemade Peanut Butter Ball
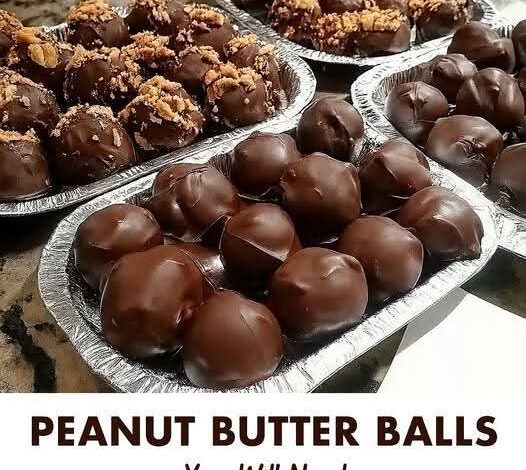
More than just a no-bake confection, the Peanut Butter Ball is a cornerstone of homemade candy. It represents a perfect harmony of simplicity and decadence. With a creamy, sweet interior enrobed in a crisp chocolate shell, it offers a satisfying textural contrast and a flavor that appeals to all ages. This recipe is a passport to nostalgia, a project for a rainy afternoon, and a guaranteed crowd-pleaser at any gathering. Forget the store-bought versions; this is about creating a heartfelt treat with your own hands.
A Bite-Sized History: The Buckeye’s Cousin
The Peanut Butter Ball is the close relative of the famous Buckeye Candy, a staple of American Midwest cuisine, particularly in Ohio (the “Buckeye State”). The name “Buckeye” comes from the nut of the Ohio buckeye tree, which the candy resembles by leaving a small circle of peanut butter visible, mimicking the nut’s appearance.
This recipe likely evolved in the mid-20th century, riding the wave of peanut butter’s popularity and the convenience of no-bake desserts. It was a way for home cooks to create something special with pantry staples, without needing an oven. Our version fully enrobes the ball in chocolate, creating a more uniform and decadent experience, but the soul of the treat remains the same.
The Complete Ingredient List
For the Peanut Butter Center:
· 2 cups (240g) Powdered Sugar: Provides sweetness and the necessary structure for a firm yet creamy center.
· 1 cup (270g) Creamy Peanut Butter: For the best texture and flavor, use a standard, no-stir peanut butter, not the natural kind that separates. The added stabilizers help the balls hold their shape.
· 6 tablespoons (85g) Unsalted Butter, melted: Adds richness and a smooth, melt-in-your-mouth quality. Using unsalted allows you to control the overall sweetness.
· 1 teaspoon Vanilla Extract: The essential flavor enhancer that rounds out the sweetness and complements the peanut butter.
For the Chocolate Coating:
· 12 oz (340g) Dipping Chocolate of Choice: This can be:
· Chocolate Candy Melts/Candy Wafers: The easiest choice for beginners. They temper easily and set with a firm, shiny shell.
· High-Quality Chocolate Chips (Semi-sweet or Milk): For a richer chocolate flavor. You may need to add 1 teaspoon of coconut oil to help it melt to a dipping consistency.
· Dark Chocolate Baking Bar, chopped: The choice for true chocolate lovers, offering a sophisticated bitterness to balance the sweet center.
Optional Add-ins & Toppings:
· A pinch of salt to enhance flavors.
· 1/2 cup crushed graham crackers or rice krispies for texture.
· A splash of maple syrup for a different flavor profile.
· After dipping, sprinkle with flaky sea salt, crushed peanuts, or festive sprinkles before the chocolate sets.
Step-by-Step Instructions & Master Methods
Method 1: The Classic Hand-Mixed Method
1. Prepare the Base: In a medium-sized mixing bowl, combine the melted (and slightly cooled) butter and the vanilla extract. Add the peanut butter and stir with a sturdy spoon or spatula until the mixture is completely smooth and homogenous.
2. Incorporate the Sugar: Gradually add the powdered sugar to the peanut butter mixture. Start by stirring, but as it thickens, you may need to use your hands to knead it until a smooth, pliable, and thick dough forms. It should not be sticky. If it is, you can add a bit more powdered sugar.
3. Form the Balls: Using a small cookie scoop or a tablespoon, portion out the dough. Roll each portion between your palms to form uniform, 1-inch balls. Place the balls on a baking sheet lined with parchment paper or a silicone baking mat.
4. The Crucial Chill: Place the baking sheet with the peanut butter balls in the freezer for at least 30 minutes, or in the refrigerator for 1-2 hours. This step is non-negotiable; it firms up the balls, preventing them from falling apart when dipped in the warm chocolate.
5. Temper the Chocolate: While the balls are chilling, melt the chocolate. The best method is using a double boiler: place a heatproof bowl over a pot of simmering water (ensure the bottom of the bowl doesn’t touch the water). Stir the chocolate constantly until just melted. Alternatively, melt in the microwave in 20-second bursts, stirring thoroughly after each interval, until smooth. If using chocolate chips or baking chocolate, stir in a teaspoon of coconut oil to thin it for easier dipping.
6. The Dipping Ritual: Remove the peanut butter balls from the freezer. Using a fork, a dipping tool, or two spoons, submerge each ball completely in the melted chocolate. Lift it out, gently tap the fork on the side of the bowl to remove excess chocolate, and place it back on the prepared baking sheet.
7. The Final Set: If you added any toppings, do so immediately after dipping. Allow the chocolate to set at room temperature, which can take several hours. For a faster set, you can place them back in the refrigerator for 15-20 minutes. Once set, transfer to an airtight container.
Nutritional Breakdown & Benefits
While this is undoubtedly a sweet treat, it does offer some nutritional benefits, primarily from its core ingredient: peanut butter.
· Protein Power: Peanut butter is a good source of plant-based protein, which helps with satiety and muscle repair.
· Healthy Fats: It provides monounsaturated and polyunsaturated fats, the “good” fats that are beneficial for heart health.
· Essential Nutrients: Peanut butter contains vitamins and minerals like Vitamin E, Magnesium, Niacin (B3), and Potassium.
· Energy Dense: The combination of fats and sugars makes these balls a quick source of energy, perfect for a pre-workout snack or an afternoon pick-me-up.
A Note on Moderation: The primary ingredients are sugar and fat. Enjoy them as part of a balanced diet. One ball typically contains around 100-150 calories, depending on size.
Conclusion: A Treat for All Lovers
In conclusion, the humble Peanut Butter Ball is more than just a recipe; it’s a culinary heirloom. Its simplicity makes it accessible, while its delicious result makes it timeless. It’s a testament to the fact that the most beloved foods are often born from a few quality ingredients combined with care.
For the Lovers of Flavor:
This recipe is for the comfort food lover seeking a taste of childhood. It’s for the busy home cook who needs a guaranteed success. It’s for the chocolate and peanut butter enthusiast who believes this is one of the world’s perfect pairings. It’s for the holiday baker looking to add a homemade candy to their gift boxes. And most of all, it’s for anyone who finds joy in the simple, satisfying process of creating something wonderful to share with the people they love. So, roll up your sleeves, melt that butter, and create a batch of these irresistible delights.