A Treatise on the Butter Buttermilk Biscuit: The Pillar of Southern Comfort
Of course! Here is a comprehensive, “big” recipe for Butter Buttermilk Biscuits, complete with all the sections you’ve requested.
A Treatise on the Butter Buttermilk Biscuit: The Pillar of Southern Comfort
Introduction
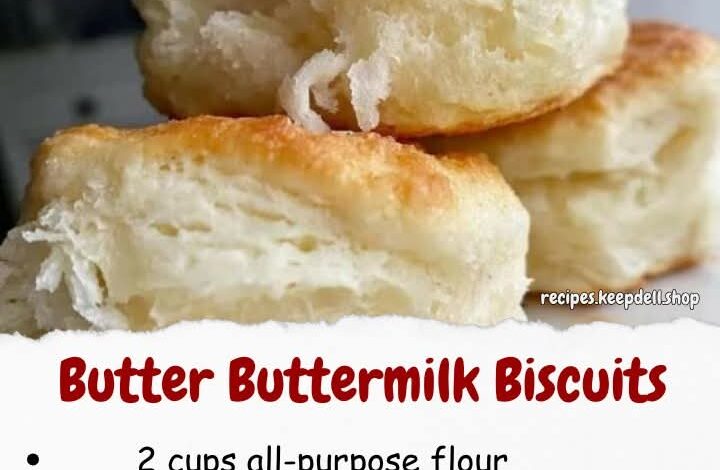
More than just a bread roll, the Butter Buttermilk Biscuit is a testament to simplicity and technique. It is a humble pillar of comfort food, a warm, flaky, and tender vessel for butter, jam, gravy, or simply the joy of eating something made with care. A perfect biscuit strikes a delicate balance: a crisp, golden-brown exterior that gives way to a soft, steaming, and layered interior. This recipe is dedicated to achieving that perfection. It is a journey into the heart of baking, where cold ingredients, a gentle touch, and a hot oven transform basic pantry staples into something sublime.
A Brief History
The biscuit’s story is one of evolution and necessity. The word itself comes from the Latin bis coctus, meaning “twice-baked,” a description for hardtack that sustained Roman armies. This hard, dry cracker was a far cry from the fluffy biscuits we know today.
The transformation began with the introduction of pearlash, a precursor to baking soda, in the 18th century. But the true revolution came in the 19th century with the advent of commercial baking powder and the availability of soft winter wheat in the American South. This low-protein wheat, combined with the newly discovered chemical leaveners and the widespread use of leftover buttermilk from churning butter, created the perfect storm for the birth of the tender, quick-rise biscuit. It became a staple of Southern cooking, a symbol of resourcefulness and hospitality, served at every meal from breakfast to supper.
The Formation: Understanding the Science of Flaky Layers
The quest for the perfect biscuit is a battle against gluten development. Gluten, the protein network formed when flour is mixed with water, is desirable in chewy bread but the enemy of a tender biscuit. The key principles are:
1. Cold Fat: Butter (or other solid fat) must be kept cold. When cold butter hits the hot oven, the water within it vaporizes into steam. This steam pushes the layers of dough apart, creating the coveted flaky pockets.
2. Gentle Handling: Over-mixing and over-kneading develop gluten, leading to a tough, bready texture. A light, confident touch is non-negotiable.
3. Lamination: The process of folding the dough creates distinct layers. As the dough is folded, sheets of butter are enclosed within layers of flour. When baked, these are the layers that separate and flake.
Ingredients
(Yields 8-10 large biscuits)
· 2 ½ cups (312g) All-Purpose Flour, plus more for dusting
· 1 tablespoon Baking Powder
· 1 teaspoon Granulated Sugar
· 1 teaspoon Salt
· ½ teaspoon Baking Soda
· ½ cup (1 stick or 113g) Unsalted Butter, very cold, and cut into small cubes
· 1 cup (240ml) Full-Fat Buttermilk, very cold
· 2 tablespoons Unsalted Butter, melted, for brushing the tops
Method & Instructions
Step 1: Prepare and Combine Dry Ingredients
Preheat your oven to a very hot475°F (245°C). This high heat is crucial for a good rise and browning. In a large mixing bowl, whisk together the flour, baking powder, sugar, salt, and baking soda. This ensures the leaveners and salt are evenly distributed.
Step 2: Cut in the Cold Butter
Add the cold,cubed butter to the flour mixture. Using a pastry cutter, two forks, or your fingertips, work the butter into the flour. Your goal is a coarse, crumbly mixture with pea-sized lumps and smaller flakes of butter throughout. Do not overwork it or let the butter melt. Those visible butter pieces are your ticket to flakiness.
Step 3: Introduce the Buttermilk
Create a well in the center of the flour-butter mixture.Pour the cold buttermilk into the well. Using a fork or a spatula, gently stir until the dough is just combined and no dry pockets of flour remain. The dough will be shaggy and sticky—this is perfect.
Step 4: Turn and Fold (The Lamination)
Turn the dough out onto a lightly floured surface.With floured hands, gently pat the dough into a rough ½-inch thick rectangle. Using a bench scraper or your hands, fold the dough into thirds, like a letter. Give the dough a quarter turn, and then gently pat it down again into another ½-inch thick rectangle. Repeat this fold-turn-pat process two more times for a total of three folds. This builds the flaky layers.
Step 5: Cut the Biscuits
After the final fold,pat the dough out to a ¾-inch to 1-inch thickness. Do not use a rolling pin if you can avoid it; patting is gentler. Dip a 2.5 or 3-inch round biscuit cutter in flour and press straight down into the dough. Do not twist the cutter. Twisting seals the edges and prevents a proper rise. Press straight down and lift straight up. Gather the scraps, gently pat them together, and cut remaining biscuits. Note that biscuits from the second patting may be slightly less uniform but just as delicious.
Step 6: Bake to Golden Perfection
Place the biscuits on a parchment-lined baking sheet,with their sides just touching. This helps them support each other as they rise, leading to taller biscuits. Brush the tops generously with the melted butter. Bake for 12-15 minutes, or until the tops are a deep golden brown and the biscuits have doubled in height.
Step 7: The Final Touch
Remove from the oven and brush the tops once more with any remaining melted butter for an extra glossy,flavorful finish. Let them cool on the pan for a few minutes before serving warm.
Nutrition & Benefits
While a butter-laden biscuit is an indulgence, it does offer some nutritional value:
· Energy: Carbohydrates from the flour provide quick energy.
· Calcium & Probiotics: Buttermilk is a good source of calcium and contains live cultures (probiotics) that can aid in digestion.
· Fat-Soluble Vitamins: Butter contains Vitamins A, E, and K2.
For a Healthier Twist:
· Substitute half the all-purpose flour with whole wheat pastry flour for added fiber.
· Use a reduced-fat buttermilk.
· For a dairy-free version, use frozen, grated vegan butter and a plant-based milk mixed with 1 tablespoon of lemon juice or vinegar to simulate buttermilk.
For the Biscuit Lovers: Serving Suggestions
The Butter Buttermilk Biscuit is a versatile canvas for culinary creativity.
· The Classic: Split open and slathered with high-quality salted butter and honey or fruit preserves.
· The Southern Staple: Smothered in creamy Sausage Gravy for the ultimate Biscuits and Gravy.
· The Breakfast Sandwich: The perfect vehicle for a fried egg, crispy bacon or sausage, and a slice of cheese.
· The Dinner Roll: Served alongside stews, soups, or fried chicken to soak up every last bit of flavor.
· Strawberry Shortcake: A slightly sweeter biscuit (add 2 more tablespoons of sugar) makes the best base for macerated strawberries and whipped cream.
Conclusion
The Butter Buttermilk Biscuit is more than a recipe; it is a craft. It teaches patience, the importance of technique, and the profound satisfaction of creating something beautiful from simple ingredients. It is a food that evokes memory and comfort, a warm, buttery embrace from the oven. While the path to biscuit mastery may require a few batches, each one is a delicious step forward. So, keep your ingredients cold, your touch light, and your oven hot. The perfect biscuit is within your reach.