Of course! Here is a comprehensive, “big” recipe for an Oreo Cream Chocolate Roll, complete with all the sections you requested.
Introduction
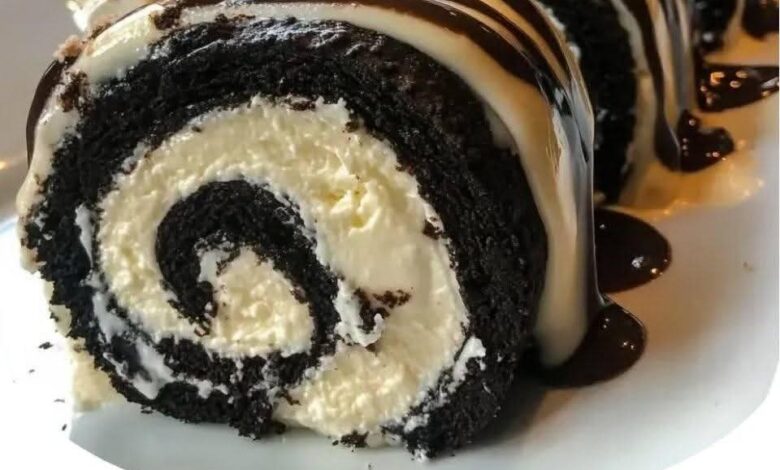
The Oreo Cream Chocolate Roll, often called an “Oreo Swiss Roll” or “Bûche de Noël” when given a festive twist, is a stunning dessert that marries the nostalgic joy of Oreo cookies with the elegant, light texture of a classic cake roll. It’s a show-stopping centerpiece for any gathering, combining the deep, dark flavor of cocoa with the sweet, creamy filling we all know and love. This recipe guides you through the process step-by-step, demystifying the art of rolling a sponge cake to create a beautiful, spiral dessert that is as delightful to make as it is to eat.
A Brief History & For the Lovers
History: The concept of a rolled cake dates back to the 19th century in Central Europe, with the Swiss Jelly Roll being a famous predecessor. The technique of baking a thin sponge cake and rolling it while warm is key to achieving its signature shape without cracking. The Oreo cookie, invented in 1912 by Nabisco, has become the world’s best-selling sandwich cookie. This recipe is a modern fusion, taking a classic European pastry technique and injecting it with a beloved American icon’s flavor.
For the Lovers: This dessert is for the ultimate Oreo enthusiast, the chocolate devotee, and anyone who appreciates a dessert that is both visually impressive and deeply satisfying. It’s for those who believe the cream filling is the best part of the cookie and for home bakers looking to conquer a classic technique with a fun, familiar twist. It’s a dessert that promises a “wow” factor and delivers a perfect slice of creamy, chocolatey heaven in every bite.
Formation & Key Methods
The “formation” of this dessert is a three-part process:
1. The Chocolate Sponge: A thin, flexible sheet of cake is baked. Its flexibility is crucial and is achieved by whipping the eggs and sugar to incorporate air, and using a specific balance of flour and fat.
2. The Rolling Technique: The warm cake is immediately turned out onto a towel dusted with powdered sugar and rolled up. This “trains” the cake’s memory, allowing it to be unrolled for filling and re-rolled without cracking.
3. The Oreo Cream Filling: A stable, whipped mixture of heavy cream, crushed Oreos, and cream cheese provides structure and intense Oreo flavor, holding the roll’s shape once assembled.
Key Methods: The success of this recipe hinges on a few critical techniques:
· Proper Aeration: Whipping the eggs and sugar until pale, thick, and tripled in volume is non-negotiable for a light sponge.
· Gentle Folding: Carefully incorporating the dry ingredients to avoid deflating the precious air bubbles.
· Confident Rolling: Rolling the cake while it is still warm and pliable.
Ingredients
For the Chocolate Sponge Cake:
· 3 large eggs, at room temperature
· 3/4 cup (150g) granulated sugar
· 1/4 cup (60ml) water or strong brewed coffee (coffee enhances chocolate flavor)
· 1 teaspoon vanilla extract
· 1/2 cup (65g) all-purpose flour
· 1/3 cup (35g) unsweetened cocoa powder, plus more for dusting
· 1 teaspoon baking powder
· 1/4 teaspoon salt
· Powdered sugar, for dusting towel
For the Oreo Cream Filling:
· 1 cup (8 oz or 225g) cold full-fat cream cheese
· 1 1/2 cups (360ml) cold heavy whipping cream
· 1/2 cup (60g) powdered sugar
· 1 teaspoon vanilla extract
· 15 Oreo cookies, coarsely crushed (filling included)
· Additional 3-4 Oreo cookies, finely crushed, for garnish
Instructions
Part 1: The Chocolate Sponge
1. Prepare for Baking: Preheat your oven to 375°F (190°C). Grease a 15x10x1-inch jelly roll pan, then line it with parchment paper, leaving a slight overhang on the sides for easy removal. Grease the parchment paper as well.
2. Combine Dry Ingredients: In a medium bowl, sift together the flour, cocoa powder, baking powder, and salt. Sifting is essential to prevent lumps and ensure a light texture. Set aside.
3. Whip Eggs and Sugar: In the bowl of a stand mixer fitted with the whisk attachment (or using a hand mixer), beat the eggs on high speed for about 2 minutes until frothy. Gradually add the granulated sugar and continue to beat on high for 5-7 minutes, until the mixture is very pale, thick, and has tripled in volume. When you lift the whisk, the ribbon of batter that falls should sit on the surface for a few seconds before dissolving.
4. Incorporate Wet Ingredients: Beat in the water (or coffee) and vanilla extract on low speed until just combined.
5. Fold in Dry Ingredients: In three additions, gently sift the dry ingredients over the egg mixture. Using a large rubber spatula, fold carefully after each addition until just combined. Be gentle to avoid deflating the batter.
6. Bake: Pour the batter into the prepared pan and spread it evenly into a thin layer. Tap the pan on the counter once to release any large air bubbles. Bake for 10-12 minutes, or until the top of the cake springs back when lightly touched.
Part 2: The Rolling Method
1. Prepare for Rolling: While the cake is baking, lay a clean, thin kitchen towel on a flat surface. Dust it generously with powdered sugar (you can also use cocoa powder for a darker finish).
2. Roll the Warm Cake: As soon as the cake is out of the oven, run a knife around the edges to loosen it. Invert the hot cake onto the prepared towel. Carefully peel off the parchment paper.
3. Train the Cake: Starting from one of the short ends, use the towel to gently but firmly roll the cake up into a log, including the towel inside the roll. Place the seam side down on a wire rack and allow it to cool completely (about 1-2 hours). This step sets the cake’s “memory.”
Part 3: The Filling & Assembly
1. Make the Oreo Cream Filling: In a clean mixer bowl, beat the cold cream cheese and powdered sugar until smooth. With the mixer on low, gradually stream in the heavy cream and vanilla. Increase the speed to medium-high and whip until stiff peaks form. Be careful not to over-whip. Gently fold in the coarsely crushed Oreos.
2. Fill the Cake: Once the cake is completely cool, carefully unroll it. It will be slightly curved, which is normal. Spread the Oreo cream filling evenly over the entire surface, leaving a small border around the edges.
3. Re-roll the Cake: Using the towel to assist you, gently but firmly re-roll the cake, pushing forward to create a tight log. Don’t roll the towel inside this time.
4. Chill and Set: Wrap the roll tightly in plastic wrap and refrigerate for at least 2 hours, or preferably overnight. This allows the filling to set and the flavors to meld.
5. Garnish and Serve: Before serving, unwrap the roll and transfer it to a serving platter. Dust the top with additional powdered sugar or cocoa powder, and sprinkle with the finely crushed Oreo cookies. Slice with a sharp serrated knife, wiping it clean between cuts for neat slices.
Nutrition & Benefits
Nutritional Information (Per Slice, approx. 10 slices):
· Calories: ~380-450
· Fat: ~25g
· Carbohydrates: ~38g
· Sugar: ~28g
· Protein: ~6g
Please note: This is an estimate and can vary based on specific ingredients used. This is a rich, celebratory dessert.
Benefits:
· Joyful Indulgence: The primary benefit is the sheer pleasure and satisfaction it brings. Sharing a beautiful, homemade dessert can boost mood and create lasting memories.
· Skill Building: Successfully making a cake roll builds confidence in the kitchen and teaches valuable techniques like working with genoise sponge and rolling.
· Customizable: Once you master the base recipe, you can experiment with different fillings—mint, peanut butter, or fruit-flavored creams.
Conclusion
The Oreo Cream Chocolate Roll is more than just a dessert; it’s a baking achievement. While it requires patience and attention to technique, the result is a breathtakingly beautiful and irresistibly delicious treat that perfectly captures the magic of an Oreo cookie in an elegant, sliceable form. From its tender chocolate sponge to its decadently creamy filling, every element works in harmony. Don’t be intimidated by the roll—embrace the process. The moment you slice into your perfectly spiraled creation and see the delight on the faces of your friends, family, and fellow Oreo lovers, you’ll know every step was worth it.