Here is a comprehensive guide to creating “Golden & Crisp: Easy Cheesy Taco Pockets,” structured exactly as you’ve requested.
Golden & Crisp: Easy Cheesy Taco Pockets
Introduction
Welcome to the ultimate comfort food fusion: the Easy Cheesy Taco Pocket. Imagine the satisfying, golden-brown crunch of a perfectly fried or baked pastry, giving way to a molten, flavorful center of seasoned ground beef and a blend of melty cheeses. This recipe is designed to capture the vibrant, beloved taste of taco night and transform it into a portable, handheld delight. It’s a guaranteed crowd-pleaser that’s simpler to make than you might think, perfect for weeknight dinners, game-day snacks, or a fun cooking activity with the family. Get ready to create a dish that is not only delicious but also brings a smile to everyone’s face.
Ingredients
· For the Filling:
· 1 lb (450g) lean ground beef
· 1 medium onion, finely chopped
· 1 packet (1 oz) taco seasoning mix (or 3 tbsp homemade blend)
· 1/2 cup water
· 1 can (4 oz) diced green chiles, drained (optional, for extra flavor)
· 1 1/2 cups shredded cheese blend (a mix of cheddar and Monterey Jack is ideal)
· For the Pockets:
· 2 cans (16.3 oz each) refrigerated biscuits (like Pillsbury Grands! Jr. or regular size)
· 1/4 cup melted butter
· Optional for topping: Everything bagel seasoning, sesame seeds, or flaky salt
Formation (Assembling the Pockets)
1. Preheat & Prepare: Preheat your oven to 375°F (190°C) if baking, or prepare a deep skillet or pot with 1-2 inches of oil for frying (heat to 350°F/175°C). Line a baking sheet with parchment paper if baking.
2. Flatten the Dough: Separate the biscuit dough. On a lightly floured surface, roll or press each biscuit into a 4-inch circle (for regular biscuits) or a 3-inch circle (for junior size). Try to make the edges slightly thinner than the center for easier sealing.
3. Fill: Place about 1-2 tablespoons of the cooled beef mixture in the center of each dough circle. Top with a generous pinch (about 1 tablespoon) of the shredded cheese. Be careful not to overfill.
4. Seal: Gently lift the edges of the dough up and over the filling, pinching them together firmly in the center to form a seam. You can crimp the edges with a fork for a decorative touch and to ensure a tight seal. Make sure there are no gaps, or the cheese will leak out.
5. Finish: Place the assembled pockets on the prepared baking sheet (seam-side down if baking) or on a tray lined with wax paper if frying.
Instructions (Cooking)
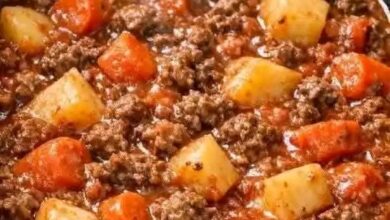
1. Make the Filling: In a large skillet over medium-high heat, cook the ground beef and chopped onion until the beef is browned and the onion is softened. Drain any excess fat. Reduce heat to low, stir in the taco seasoning, water, and green chiles (if using). Simmer for 5 minutes, until most of the liquid has evaporated. Remove from heat and let it cool slightly. (Cooling prevents the hot filling from melting the cheese too early and making the dough soggy).
2. Assemble: Follow the “Formation” steps above to create your pockets.
3. Cook Your Pockets (Choose a Method):
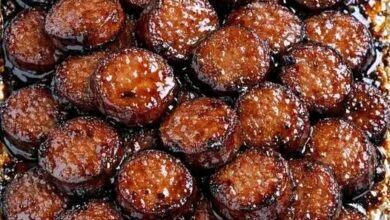
· Baking (Healthier & Easier): Brush the tops of the pockets with melted butter. Bake for 12-15 minutes, or until they are puffed up and golden brown.
· Frying (Extra Crispy): Carefully place 3-4 pockets at a time into the hot oil. Fry for 2-3 minutes per side, until they are deeply golden brown and cooked through. Drain on a wire rack or paper towel-lined plate.
Methods
· The Stovetop Frying Method: This classic method delivers the ultimate “Golden & Crisp” texture promised in the title. Using a neutral oil with a high smoke point, like vegetable or canola oil, ensures a quick, even fry without burning. The hot oil instantly seals the dough, creating a satisfyingly crunchy exterior that contrasts beautifully with the soft, cheesy interior. It’s fast, reliable, and delivers that nostalgic fair-food feel.
· The Oven-Baking Method: For a lighter, hands-off approach, baking is the way to go. Brushing the pockets with melted butter before baking mimics the richness of frying and encourages a beautiful, golden-brown finish. This method is excellent for making a larger batch at once and results in pockets that are slightly less greasy but still wonderfully flaky and crisp.
· The Air Fryer Method: A fantastic modern hybrid. Preheat your air fryer to 375°F (190°C). Place the pockets in a single layer in the basket (work in batches), lightly spray or brush with oil, and cook for 6-8 minutes, flipping halfway, until golden and crispy. This method rivals frying in crispiness with significantly less oil and a faster cook time.
History (A Fictional Backstory)
The Easy Cheesy Taco Pocket doesn’t have a long, storied past, but it’s a proud child of the late 20th-century American kitchen. It was born from the ingenious combination of two convenience food staples that defined an era: the refrigerated biscuit and the taco seasoning packet. A home cook in the 1980s, looking for a fun twist on Taco Tuesday, likely had the bright idea to stuff one into the other. It quickly became a beloved family recipe, passed around on handwritten cards and in community cookbooks, evolving with the addition of different cheeses and serving sauces. It represents a time when simple, creative cooking at home was all about bringing big flavors to the table with minimal fuss.
Benefits
· Crowd-Pleasing Flavor: Combines the universally loved taste of tacos with the fun, hand-held format of a stuffed pastry.
· Customizable: Easily adapt to dietary needs. Use ground turkey or chicken, add beans or corn to the filling, or use a dairy-free cheese alternative.
· Fun and Interactive: A great recipe to get kids involved in the kitchen, from mixing the filling to pinching the pockets shut.
· Great for Entertaining: These pockets can be made ahead, are easy to transport, and are perfect for parties, potlucks, and game-day gatherings.
· Portion Control: Each pocket is a self-contained serving, making it easy to manage portions.
Nutrition (Per Pocket – Approximate, based on baking with regular biscuits)
(Disclaimer: Nutritional values are estimates and will vary based on specific ingredients, portion sizes, and cooking method. Frying will significantly increase fat and calorie content.)
· Calories: 280-350
· Fat: 15-20g
· Carbohydrates: 25-30g
· Protein: 12-15g
· Sodium: 700-900mg
Lovers (Who will adore this recipe?)
This dish is a surefire hit for:
· Families with Kids: It’s the ultimate kid-friendly meal—fun to eat and packed with familiar, cheesy goodness.
· Teenagers and Hungry Appetites: The combination of carbs, protein, and cheese is incredibly satisfying and filling.
· Party Hosts: Anyone looking for a guaranteed hit at a Super Bowl party, birthday gathering, or casual get-together.
· Taco Enthusiasts: Those who can’t get enough of that classic taco flavor and are looking for new ways to enjoy it.
· Comfort Food Cravings: It’s the perfect answer to a craving for something warm, cheesy, and deeply satisfying.
Conclusion
The Golden & Crisp Easy Cheesy Taco Pocket is more than just a recipe; it’s an experience. It’s the sound of the first satisfying crunch, the sight of the gooey, melted cheese stretching from the first bite, and the burst of familiar, zesty taco flavor that follows. Whether you choose the convenience of baking or the decadent crunch of frying, this recipe delivers a fun, delicious meal that brings people together. So, gather your ingredients, preheat your oven or oil, and get ready to create a new family favorite that’s sure to be requested again and again. Enjoy