Of course! Here is a comprehensive, big recipe for Japanese Cheesecake, expanded from your ingredients list and structured with all the sections you requested.
—
Introduction
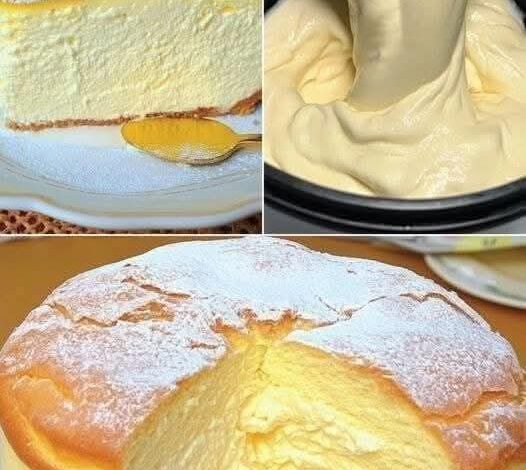
Japanese Cheesecake, also known as cotton cheesecake or soufflé cheesecake, is a dessert that inspires awe and delight. Unlike its dense, rich New York-style counterpart, this cheesecake is an ethereal creation—incredibly light, fluffy, and jiggly. It’s a harmonious blend of a Western cheesecake and a Japanese sponge cake, resulting in a delicate, moist, and subtly sweet experience that melts in your mouth. Mastering this recipe is a rewarding challenge for any baker, promising a show-stopping dessert that is as beautiful as it is delicious.
A Brief History
The Japanese cheesecake was popularized in the 1990s by Tomotaro Kuzuno, a Japanese pastry chef. Inspired by a käsekuchen (German cheesecake) he tasted in Berlin, he returned to Japan and sought to create a lighter version that would appeal more to the Japanese palate, which often favors less sweetness and a more delicate texture. His creation took the country by storm, leading to the iconic product we know and love today. Its characteristic “jiggle” has since become a viral sensation, symbolizing its unique, airy quality.
Why We Love It: The Benefits
· Light as a Cloud: It’s significantly less dense and heavy than traditional cheesecake, making it a perfect dessert after a large meal.
· Subtly Sweet: It contains less sugar, allowing the creamy, cheesy, and citrus notes to shine without being overpowering.
· Impressive Yet Approachable: While it requires care, the techniques are manageable and the “wow” factor is immense.
· Versatile: It’s delicious served plain, with a dusting of powdered sugar, fresh berries, or a dollop of whipped cream.
Formation & Key Principles
The magical, airy texture of this cheesecake is achieved through two critical methods:
1. Meringue: Egg whites are whipped to soft peaks and then gently folded into the cream cheese batter. This incorporates thousands of tiny air bubbles, which expand in the oven, causing the cake to rise.
2. Water Bath (Bain-Marie): The cake pan is placed in a larger pan filled with hot water. This steam creates a gentle, humid heat that cooks the cheesecake evenly, prevents cracking, and ensures a moist, tender crumb.
—
Japanese Cheesecake Recipe
Ingredients
Cake Batter:
· 8 ounces (225g) full-fat cream cheese, softened to room temperature
· 4 tablespoons (60g) unsalted butter, softened
· 6 large eggs, separated into yolks and whites
· ⅓ cup (80ml) whole milk or heavy cream
· 1 tablespoon fresh lemon juice
· 1 teaspoon vanilla extract
· ½ cup (60g) cake flour (or all-purpose flour), sifted
· 1½ tablespoons (12g) cornstarch, sifted
· ¼ teaspoon salt
· 1 tablespoon lemon zest
Meringue:
· ⅓ cup + 1 tablespoon (80g) granulated sugar
· ¼ teaspoon cream of tartar (optional, but helps stabilize the meringue)
Equipment
· 8-inch (20cm) round springform pan
· Larger roasting pan for the water bath
· Aluminum foil
· Stand mixer or hand mixer
· Sifter
· Rubber spatula
—
Instructions & Methods
Step 1: Preparation is Key
1. Preheat Oven: Preheat your oven to 320°F (160°C).
2. Prepare the Pan: Line the bottom of the springform pan with parchment paper. Do not grease the sides, as the cake needs to cling to the pan to rise properly.
3. Waterproof the Pan: Tightly wrap the outside of the springform pan with two layers of heavy-duty aluminum foil to prevent water from the bath seeping in.
4. Prepare Water Bath: Place the wrapped springform pan inside the larger roasting pan. Put a kettle of water on to boil.
Step 2: Make the Cheese Batter
1. Melt Base: In a heatproof bowl set over a pot of simmering water (double boiler), combine the softened cream cheese, butter, and milk/cream. Gently whisk until the mixture is completely smooth and lump-free. Remove from heat and let it cool slightly.
2. Incorporate Yolks: Whisk in the egg yolks, one at a time, until fully combined.
3. Add Flavors: Stir in the lemon juice, vanilla extract, and lemon zest.
4. Incorporate Dry Ingredients: Sift the cake flour, cornstarch, and salt into the cheese mixture. Whisk gently until just smooth and no lumps remain. Do not overmix. Set this batter aside.
Step 3: Create the Meringue
1. Whip Whites: In a very clean, grease-free bowl, beat the egg whites on medium speed until they become frothy. Add the cream of tartar (if using).
2. Add Sugar Gradually: Gradually add the sugar, about a tablespoon at a time, while beating on medium-high speed. Continue beating until the meringue reaches soft peaks—this is crucial. The peaks should curl over when you lift the beaters. Do not whip to stiff peaks, as this can make the cake crack.
Step 4: The Delicate Folding Method
1. Lighten the Batter: Take one-third of the meringue and whisk it vigorously into the cheese batter. This first addition helps to lighten the thick batter, making it easier to fold in the rest.
2. Fold Gently: Add the remaining meringue in two parts. Using a rubber spatula, gently fold the meringue into the batter using a figure-8 motion. Slide the spatula down the side of the bowl, across the bottom, and up the other side. Rotate the bowl as you go. The goal is to incorporate the meringue fully while deflating as little air as possible. Stop as soon as no white streaks remain.
Step 5: Baking in a Water Bath
1. Pour Batter: Pour the final batter into the prepared springform pan. Tap the pan lightly on the counter a few times to release any large air bubbles.
2. Create the Bath: Place the roasting pan with the springform pan in it into the preheated oven. Carefully pour the hot water from the kettle into the roasting pan until it comes about halfway up the sides of the springform pan.
3. Bake: Bake for 60-70 minutes. The cake will rise beautifully and should have a golden top. It is done when the top feels firm and a skewer inserted into the center comes out clean.
Step 6: The Critical Cooling Process
1. Turn Off Oven: Turn off the oven and crack the oven door open slightly, using a wooden spoon to hold it ajar.
2. Cool in Oven: Let the cheesecake cool inside the turned-off oven for 60 minutes. This gradual temperature change prevents the cake from collapsing dramatically.
3. Cool Completely: Remove the cake from the water bath and unwrap the foil. Let it cool completely in the pan on a wire rack. It will deflate slightly, which is normal. Once cool, run a thin knife around the edge to loosen it before releasing the springform ring. Chill in the refrigerator for at least 4 hours, or preferably overnight, for the best texture and flavor.
—
Nutrition Information (Per Serving, approx. 1/12 of cake)
· Calories: ~250 kcal
· Carbohydrates: 20g
· Protein: 6g
· Fat: 16g
· (Note: These are estimates and can vary based on specific ingredients used.)
—
Conclusion
The journey of creating a Japanese Cheesecake is a lesson in patience and precision. From the gentle folding of the meringue to the slow cooling in the oven, each step is designed to preserve its delicate structure. The result is more than just a cake; it’s a sublime culinary experience—a testament to the beauty of simplicity and technique.
For the Lovers
This cake is for those who appreciate subtlety over intensity, texture over sheer richness. It’s for the home baker looking for a rewarding challenge, for the dessert lover seeking something uniquely elegant, and for anyone who believes that food should be a delight for all the senses. The sight of its iconic jiggle, the light-as-air feel on the tongue, and the delicate, creamy flavor are what make Japanese Cheesecake lovers come back for one more slice, time and time again.