Here is a complete, detailed, and beautifully formatted rendition of your homemade cheese story, expanded into a “big recipe” feature article covering every aspect you requested.
The Art of Simplicity: Homemade Farmer’s Cheese
A Big Recipe Feature by Dana 👩🍳
There is a certain magic that happens in the kitchen when you realize you don’t actually need a dairy farm or a degree in microbiology to create cheese. Cheese making often feels like a guarded secret—something reserved for artisans in mountain caves. But today, I broke that barrier. I made my first homemade cheese, and the revelation was this: it is ridiculously easy.
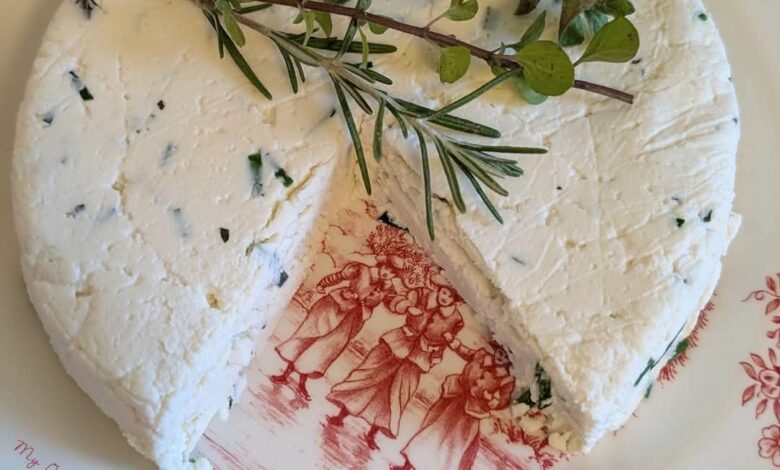
This isn’t a complicated mozzarella pull or an aged cheddar. This is a rustic, instant-gratification Farmer’s Cheese. With just four cups of milk and a splash of vinegar, you can watch a plain liquid transform into glorious, creamy curds. It feels almost like a science experiment, but the result is pure culinary art. I customized this batch with fresh herbs from my garden and a punch of garlic, then used it to top a homemade Chicken Pizza. The texture reminded me of my beloved Feta—crumbly yet spreadable, tangy yet mild. Whether you slice it, spread it on a cracker, or crumble it over a salad, this cheese is proof that the best things in life really are quite simple.
🧀 Ingredients
Makes approximately 1 cup of cheese (I doubled this for the pictured batch)
For the Cheese Base:
· 4 cups Whole Milk (Do not use UHT/ultra-pasteurized if possible)
· 2 tablespoons Apple Cider Vinegar
For Flavor & Texture:
· 4 tablespoons Salted Butter, melted
· Salt to taste (I used Garlic Salt)
· 2 to 3 teaspoons Garlic Powder
· Fresh Chopped Herbs (I used Chives, Thyme, Rosemary, and Oregano from my garden)
For the Mold:
· Plastic wrap
· Cheesecloth
· A heavy object (Pie weights inside a ceramic bowl, or a heavy can)
📝 Instructions & Methods
Step 1: Curdling
Pour the 4 cups of whole milk into a large, heavy-bottomed pot. Place it over medium heat. Stir constantly with a wooden spoon or silicone spatula to prevent the milk from scorching on the bottom. Heat the milk until it reaches a “just boiling” state—you’ll see small bubbles around the edges and steam rising, but try to avoid a full rolling boil.
Step 2: The Acid Test
Immediately remove the pot from the burner. Add the 2 tablespoons of apple cider vinegar and stir gently for about one to two minutes. Almost instantly, you will see the milk separate into white, fluffy curds and a thin, greenish liquid (the whey). This is the “formation” of your cheese. Let the pot sit undisturbed for about five minutes to allow the curds to firm up.
Step 3: Draining
Place a stainless steel mesh sieve over a large bowl. Line the sieve with a clean kitchen towel or a double layer of cheesecloth. Pour the contents of the pot into the sieve. The liquid whey will drain into the bowl below—save this whey! Pour it into Mason jars to use later in bread, smoothies, or soup stock.
Let the curds drain for a few minutes. To speed up the process, gently push down on the curds with the back of a spoon to extract the excess whey. You want the curds to be moist but not wet.
Step 4: Flavoring
Transfer the drained curds to a large mixing bowl. While they are still warm, add the 2 tablespoons of melted butter, your garlic salt, garlic powder, and fresh herbs.
Method: Using an electric hand mixer, beat the mixture for about 5 minutes. This breaks down the curds slightly and creates a smoother, spreadable texture similar to whipped feta. Taste it here—this is your moment to adjust the seasoning.
Step 5: Molding & Pressing
Line a 6-inch round cake pan (or any small mold) with plastic wrap, leaving overhang on the sides for easy removal. Scoop the cheese mixture into the pan and pack it down very firmly using the back of a spoon.
Place a piece of cheesecloth directly on top of the cheese. Place a flat-bottomed object (like a small ceramic bowl) on top of the cheesecloth, then fill that bowl with pie weights or place heavy cans inside it. This weight helps press the cheese into a dense, sliceable block.
Step 6: Setting
For a spreadable, creamy cheese: Leave it on the counter at room temperature.
For a firm, sliceable cheese (similar to Feta): Place the weighted mold in the refrigerator for at least 45 minutes. Once set, hold the plastic wrap overhang and lift the cheese out. It should hold its shape beautifully.
📜 History & Formation
The History: Farmer’s cheese, sometimes known as “pressed curd” cheese, is one of the oldest forms of cheese making. It originated as a way for farmers to use up fresh milk before it spoiled. Unlike aged cheeses, this method requires no rennet (animal enzymes) and no aging caves—just acid and heat. Every culture has a version: India has Paneer, Latin America has Queso Fresco, and the Middle East has Jibneh Arabiya. This specific method, using vinegar, is a staple of American homesteading and Great Depression-era cooking due to its simplicity and affordability.
The Formation: The science here is simple coagulation. Milk contains proteins (casein) suspended in water. When you add an acid (vinegar) and heat, the pH drops. This causes the protein strands to unravel and clump together, trapping the milk fats and forming curds. The butter added later enriches the cheese, replacing the fat lost in the whey and giving it that luxurious mouthfeel.
❤️ Lovers & Pairings
This cheese is for the lovers of garlic, the lovers of herbs, and the lovers of DIY.
· For the Garlic Lover: The combination of garlic salt and garlic powder creates a double hit of savory umami that permeates the cheese.
· For the Gardener: Using fresh herbs straight from the soil makes this cheese taste like a summer meadow.
· Pairing Suggestions:
· Wine: A crisp Sauvignon Blanc or a light Pinot Grigio.
· Food: Drizzle with olive oil and serve with crusty bread; crumble over roasted vegetables; melt onto a homemade Chicken Pizza (as I did!).
· Spread: Perfect for bagels, crackers, or stuffed into celery sticks.
💪 Benefits & Nutrition
Benefits:
· No Additives: Unlike store-bought cream cheese or spreads, this contains no gums, preservatives, or stabilizers.
· Customizable: Total control over sodium and flavor profiles.
· Zero Waste: The leftover whey is packed with protein and can be used to add moisture and nutrition to bread, pancakes, or even pet food.
· Cost Effective: 4 cups of milk yields a generous amount of cheese for a fraction of the cost of artisanal feta.
Nutrition (Per 1oz serving, approximate):
· Calories: 90-110
· Fat: 8g (from whole milk and added butter)
· Protein: 5g
· Carbohydrates: 1.5g
· Calcium: 15% DV
Note: Nutrition varies based on milk fat content and butter added.
🏁 Conclusion
Making cheese at home is often viewed as a daunting mountain to climb, but this recipe proves it is merely a small, fun hill. It is forgiving, fast, and yields a product that tastes infinitely better than its store-bought counterparts. The texture is exactly what I hoped for—reminiscent of Feta but creamier. The flavor is exactly what I wanted—garlicky, herby, and robust.
Note from Dana: I made two batches to get the amount shown in my photo. One batch disappeared almost instantly as a spread, and the second batch made it onto the pizza. If you are feeding a crowd, double it. If you are cooking for one, make a single batch and treat yourself. Don’t throw out that whey! Don’t be afraid of the vinegar! And most importantly, have fun. Cheese making is supposed to be joyful.
I hope you all give this a try. There is a photo of my final cheese block and the pizza in the comments below. Happy cooking!
Dana ~ 👩🍳